Want to buy or sell something? Check the classifieds
  • The Fedora Lounge is supported in part by commission earning affiliate links sitewide. Please support us by using them. You may learn more here.

Making a Western hat by hand?

Yahoody

One Too Many
Messages
1,110
Location
Great Basin
Couple of things to remember. If you are doing a "one off" hat it won't matter. But most will want to do another hat at some point. So black and dark colored hats get one set of tie downs, and puller downer. Pusher downer too if you are going from black to a white or silver belly. Even your hands will leave stains on the lighter colored hats, so pay attention and be careful.

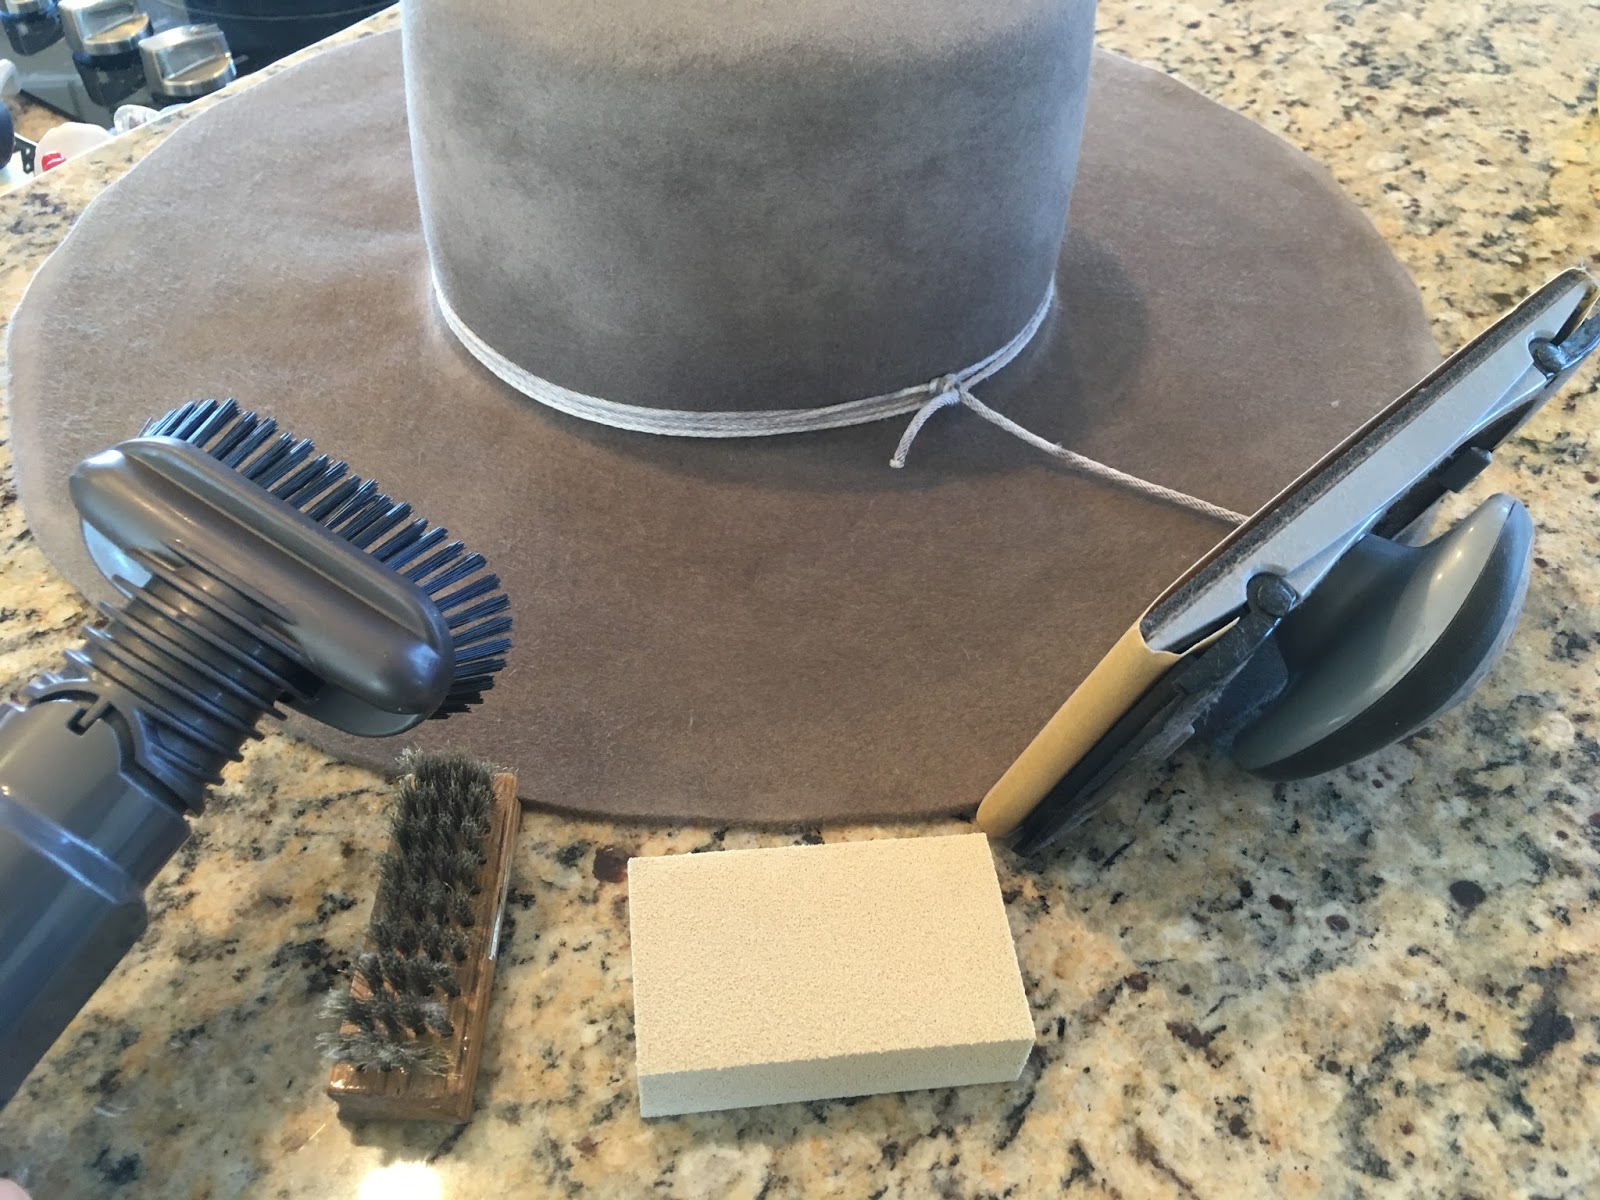
Here is my tool set just prior to wetting the crown.

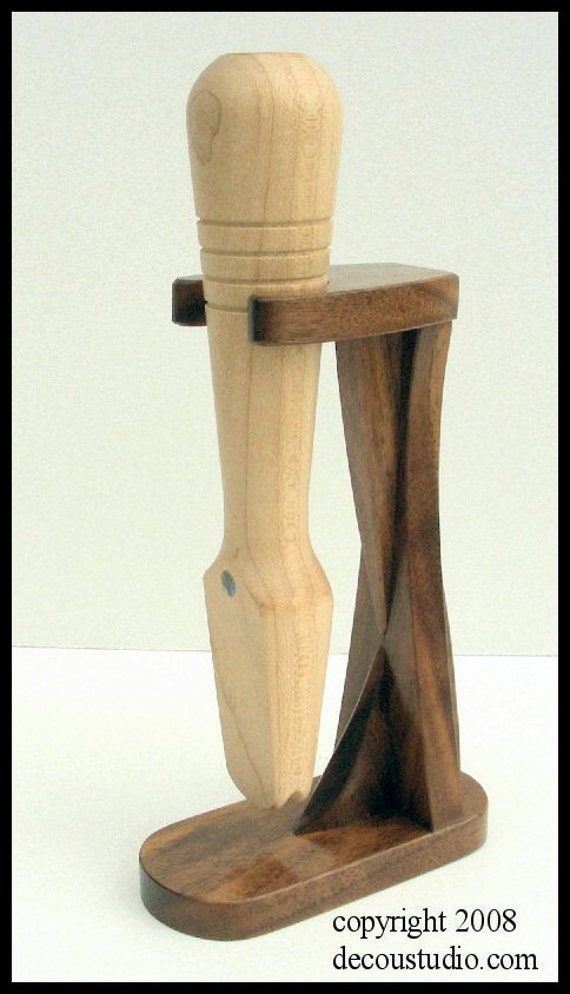
24.5" modified dome hat block. I wear a extra LO 7 3/8. A red scotch brite pad to clean my hat block. I some times but not always wrap my block in plastic wrap. But I don't like how the felt molds ot the wrap so this time we go "naked" again on the block. Two sets of strings, for light and dark hats. Likely use the darker set on the "natural" color. Pusher downer, puller downer. Block spinner and extension. Neither of the last two are required...just handy.


Yahoody

One Too Many
Messages
1,110
Location
Great Basin
OK..first off. Beginning to end of today's hat making session was just an hour and 10 minutes, including looking for a few misplaced tools, taking photos, prior posts this morning and the actual blocking of the hat. An hour and 10 minutes and I wasn't n a hurry just trying to do the best job I know how. Now once the hat crown is dry (I'll leave it 24 hrs if no more) I can start pouncing/sanding he felt. A major part (25% or more I figure) of building a hat is already done!

Follow along :)

I'm pretty set on what I want for a hat and a hat shape. So I know where I am going with this hat. Pretty much the same as my other hats. But this finished blank prior to forming could be most anything. I've learned over the years that with my particularly hard to fit head this shorter, squared off, open crown fits my head pretty well. I my case it is form fits the function..and my head. I can live with the cosmetics.


My dry beaver hat blank and my hat block ready to go.


Filling the crown up with *warm* water. Not hot and not cold....just warm to the touch. Cold doesn't work as fast on the felt and any thing actually hot I'd bet isn't good for felt. I fill the water right to the break of crown and brim. I like to keep the brim as dry as possible.


Bought there...


Just prior to inserting the block. The crown is wet inside but not soaked through.


I've stuck my block in the hat now and am pulling (with a puller downer) the crown onto the block. I'm not gentle here but I am careful. Air is forcing water beads through the hat crown. I leave them there to soak in as I work.


The more I pull the brim and the block into the crown, the wetter the outside of the crown is getting.


I'm starting to spin my wheels pulling the crown on the block so I add the string. The crown is going up on the opposite side I ma pulling down. So withoutthe string attached I'd not get the crown stretche over the block easily...if ever! The string has a hatter's slip knot on the loop. The loop is big enough to take 3 loops around the 24.5" block. The string will keep the crown in place on the block as I pull the crown down on the bloc. Eventually I am looking to get that string into the "string line" cut into on the bottom of the wooden hat block. That "line" and my string will eventually make the break between between brim and crown.

I ened up using my longer and darker string on this hat.


string line on the block...almost there!


dang near there!


Now we have a mess! WTF!
No flat hats here ?!!????? And if left to dry like this a serious mess to clean up.


Not to worry. The modern steam iron was just science fiction for a hatter prior to 1900.
But not to us thankfully.

Make sure you use a cover of some type over the felt to iron on. I use the wife's kitchen towels. I move th towel around as I iron. But never any contact of iron to felt! Granite counters are a huge help as well. But anything flat that won't catch fire will work just as good. I've ironed hats on a sheet of plywood and big wood cutting boards prior. I'm not picky just need flat and smooth.


Getting close....this is after hand forming (petting?) the crown perfectly to the top of block.
But the brim still needs some steam and hard ironing at the crown break to get a flat brim with no wrinkles. I've also moved the string down with the runner downer, tightening the slip knot as I go. String has sucked in nicely at the block's string line cut.


Done for today...and damn near ready to wear as is.

A day of "rest" won't hurt the felt either.

A thought on the steam iron? Seen others not iron until the pouncing is done. And not use a steam iron. My thought on that is a bad idea for both. Hat is going to be damp just from handling, and easier to mold once the crown is done. Steam just helps all that and allows the iron to be set at a cooler temp and less damaging to the felt. The wrinkles at the crown break are a bitch to get out of the hat latter. I like to keep the heat, water and steam off the hat as much as possible but once wet, I figure it is the perfect time to get that hat flaaatttt!

Right now we have a crisp crown break, a tight (on the top of the hat block) 5.5" crown and a flat, full 5+" brim. Not much over 5"....might get 5.25" from this one if I ma lucky after I run the hat jack around it. I've found hat bodies are always luck of the draw trying to get the most out of them for brim width. This one was advertised as a 5" brim. I'll get that.

I wanted 5" brim and a 5.5" crown. I need a shorter block to get that done right and no way to pull another 1/2" out of this hat body. I did special order shorter crown...but my fault as no hat body to make it work right. Just not going to get much more than 5.25" from Winchester with my 7 1/2 size block/head.

At this point the hat body could easily be shaped or the brim cut to dang near anything.

Anyone doing something different, or feel they have a better, easier way to a better hat please feel free to join it!

 
Last edited:

Yahoody

One Too Many
Messages
1,110
Location
Great Basin
I was able to keep the brim dry enough to start pouncing this afternoon. Not soaking the crown through has also allowed me to start there as well as long as I am cautious and light while hand sanding.

Not much to it. Start with 320 work up to 600 or 800 grit. Always work in the same direction, no backward movement. I do everything, the crown, the crown top and sides and the brim in a clock wise motion. Counter clock wise will work as well....just do all in the same direction. Don't go too fast or push too hard or you'll burn the felt. Felt changes colors when you do. Not a big deal and it can be sanded out. Just go slow so the burn isn't too deep. Everyone will do it on their first hat I suspect. Like porn...you'll know it when you see it. Long as it isn't too bad (the burn) it is also easy to ignore or just sand out.

Good look at the "dust" from 320grit on the right and 600 grit on the left. You can expect a good size pile of beaver dust when you are finished :)


600 grit dust.


You can see where the felt is still wet in this photo...crown top and middle. And the dry areas I "burnt" on the outside edge of the brim. Feel/hand of the felt has already changed dramatically. More tomorrow. Felt needs rest and dry out for a few hours.

 
Last edited:

Cornshucker77

Call Me a Cab
Messages
2,691
Location
Northeast Nebraska, USA
I was able to keep the brim dry enough to start pouncing this afternoon. Not soaking the crown through has also allowed me to start there as well as long as I am cautious and light while hand sanding.

Not much to it. Start with 320 work up to 600 or 800 grit. Always work in the same direction, no backward movement. I do everything, the crown, the crown top and sides and the brim in a clock wise motion. Counter clock wise will work as well....just do all in the same direction. Don't go too fast or push too hard or you'll burn the felt. Felt changes colors when you do. Not a big deal and it can be sanded out. Just go slow so the burn isn't too deep. Everyone will do it on their first hat I suspect. Like porn...you'll know it when you see it. Long as it isn't too bad (the burn) it is also easy to ignore or just sand out.

Good look at the "dust" from 320grit on the right and 600 grit on the left. You can expect a good size pile of beaver dust when you are finished :)


600 grit dust.


You can see where the felt is still wet in this photo...crown top and middle. And the dry areas I "burnt" on the outside edge of the brim. Feel/hand of the felt has already changed dramatically. More tomorrow. Felt needs rest and dry out for a few hours.

I'm just curious Yahoody, when does the Jack Daniels come in to use? ;) I'm enjoying this and learning. Thanks for taking the time to do this.
 

Desert dog

My Mail is Forwarded Here
Messages
3,291
Location
California
I was able to keep the brim dry enough to start pouncing this afternoon. Not soaking the crown through has also allowed me to start there as well as long as I am cautious and light while hand sanding.

Not much to it. Start with 320 work up to 600 or 800 grit. Always work in the same direction, no backward movement. I do everything, the crown, the crown top and sides and the brim in a clock wise motion. Counter clock wise will work as well....just do all in the same direction. Don't go too fast or push too hard or you'll burn the felt. Felt changes colors when you do. Not a big deal and it can be sanded out. Just go slow so the burn isn't too deep. Everyone will do it on their first hat I suspect. Like porn...you'll know it when you see it. Long as it isn't too bad (the burn) it is also easy to ignore or just sand out.

Good look at the "dust" from 320grit on the right and 600 grit on the left. You can expect a good size pile of beaver dust when you are finished :)


600 grit dust.


You can see where the felt is still wet in this photo...crown top and middle. And the dry areas I "burnt" on the outside edge of the brim. Feel/hand of the felt has already changed dramatically. More tomorrow. Felt needs rest and dry out for a few hours.

Yahoody, this is such an interesting and informative thread! Thank you for sharing and demonstrating the skills you have learned!

Sent from my SM-G920V using Tapatalk
 

Yahoody

One Too Many
Messages
1,110
Location
Great Basin
...be nice to see the other tools in use....

IMG_7474.JPG


My list from yesterday:

Tools on hand this morning:
sink with hot water
tea kettle (didn't need it with this body yesterday)
steam iron
hat block
puller downer
pusher downer
blocking ties (hat strings to tie off the hat block)
sanding blocks

The spinner and spacer in use..allows you to easily spin the hat while the block is in place and the little block gets you the clearance when pulling the crown to get to the string line easier. I typically don't use it as a spinner. Easier to just do that by hand on our counter tops.


Pusher downer (also called a hammer downer) in used to force the string line down the crown to the string line cut in the wooden hat block. So cautions on the pusher downer next.

this is the really handy side for moving the string down


way way too sharp as it came from Judith


rounded the edges enough to not tear felt again


fixed now but a little late


I bought a string kit from Judith's https://www.judithm.com/ for $10
https://www.judithm.com/products/runner-blocking-tie-set

If i had known what I was doing and taken the pusher down to a grinding wheel right off it would have bene a bargain. As it was no knowing that $10 cost me a couple hundred $s and some heartburn.

It was cheap and I like how the strings are tied and the double ended pusher downer. But the single point end was way, way too sharp as it came. Not realizing that I punched a hole in a full beaver body...at the price of $150....and a wrecked hat that was almost finished for labor. So the hat body and half a day's work when I was doing it all by hand. The more costly pushed downers can run you $75 for just the wooden tool. In retrospect $75 would have been a bargain. And I'd have happily paid $10 to see how the string was tied.

il_570xN.308758768.jpg


The hat body was bone dry this morning. One of the advantages to living in a desert with really low humidity. I did a quick sanding with 600 grit on a big block to remove dome dents the bottles left on the brim and then brushed down the hat pretty good with a brass hat brush. Then I used a hat sponge on it and finally a good hit with the hand vac. Just a little more pouncing to be done (sanding) and them I am ready to pull the hat block. Next up I'll need to size and sew up my sweat band prior to sewing it into the hat.

Ha....but I am not terribly impressed with a hand sewn sweat band having done a bunch of them. So these days I skip the labor and order exactly what I need off Ebay, a couple of them at a a time. :) More to come on both versions of a sweat band and a quick review of the hat making book I mentioned earlier.


I just got a long term project I have been working back from bluer late yesterday and spent the evening fitting parts and putting this one back together. It is a 44-40, black powder frame Colt with one piece walnut grips. I am a little distracted from the hats at the moment. I suspect you guys can forgive me a short hat hiatus while I get some shooting in with a new blaster :)


Yahoody

One Too Many
Messages
1,110
Location
Great Basin
Quick book report first. Got the "cowboy hat making" book by Scott Goodwin in a couple of days ago. If you are interested in building a hats or hats it is worth the price I think. Lots of details I am too lazy to get into. Lots of details simply missing that are here listed here though.

A gazillion ways to build a hat. I took the same 3 day class 2 years apart from the same two guys. Learned as much each time although I only stayed for a day and 1/2 the second time around. And even they did most things totally different between the two classes. Knew a lot from my own experience of decades playing with my own hats prior.

Saw instructors wreck hats in the class and allow students to wreck hats...simply because they didn't care and allow poorly fitting hats walk out the door, again, because they simply didn't care. Shame on them.

Go slow, take your time. Expect to have some mistakes. Look at the details, talk/read/listen to as many folks making hats as you can. Mistakes aint no thing......you can always make another hat :) The resulting knowledge is priceless.

------------------------
String off with a good, sharp brim to crown transition line


Block out of the hat this morning.


Still have to fire the hat and run a hat jack around it to trim the brim but here is what were are looking for in parts to go in the hat eventually.


my preferred sweat band


Band pre sewn to size and hat band material ready to size and sew. Note the plastic reed in the upper sweat band material photo.


Pre sewn to size band in natural leather, no dye...which is my preference no dye.


and what I am looking for in the end eventually.


After I have fired the hat and cleaned it back up...next is hand sewing. No one's favorite for sure :) But also not really much to it either.
 
Last edited:

Yahoody

One Too Many
Messages
1,110
Location
Great Basin
A hat on fire! You'll want to go back and review the first part of this thread about firing a hat.
Here is my short take. I only work with full beaver blanks. I wouldn't buy a beaver hat that hadn't been fired. The body and durability I want won't be there if the hat isn't fired properly. Some folks skip this step for various reasons. Only good reason not to fire a hat that I can think of is wanting a "white" hat. I'll never make a white hat because of it...silver belly and darker no problem, sure. Clean up after the burn on a lighter color hat can be problematic. I have found a really good shop vac does everything I need. But then I am making "working hats" not likely to be taken to the opera.

Priorities.

The super thin and rich velvety feel of a finely pounced beaver hat is incomparable. But unfired it has no body to the felt as a comparison. Makes a nice fedora but a worthless cowboy hat Unfired the body is going to be floppy by that same comparison. Firing the hat gives it great texture and stiffness while still staying soft with that velvety feel once lightly pounced again. Firing the felt will give you a very thin and light weight hat that has a good stiff brim and crown that will easily hold their shape after molding, remolding, steam shots and numerious boughts of rain and abuse.


Here is that same natural color beaver blank after firing while I vacuum off the burn. You can easily see the color changes between burn and vacuum line if you look close. Darker brown tinge is burnt beaver fuzz :) But it easily vacuums off if you aren't super picky on the hat's color. If you're that picky, stick to dark browns or black. 'Cuz you really want to burn your beaver hat in the making.

Caution here!
Hat will stink bad when wet ( like a roasting beaver) if you don't fully vacuum off the burn. And you'll likely never mistake a burnt hat for an unburnt one again even from a few feet away! Now, aint that handy!?


Use a big spray bottle with plain old rubbing alcohol. Give the hat a light once over and light it up. Burn the top first. The bottom makes a chimney and gets much hotter. Burn it second. Less is more on the alcohol. You can always burn it again if you don't think the hat got a good burn first time around. I did one hat three different times until I was satisfied with the new texture of the hat. Check for consistency on the hand (feel) of the felt. Does it feel the same all over?...is it stiffer than before the burn? If not burn it again...but easy on the alcohol!
 
Last edited:

Yahoody

One Too Many
Messages
1,110
Location
Great Basin
OK, stop the presses. I am waiting on a new rounding jack from Jack @ Human shoes...
Which is a good thing.


This hat is as nice as any thing I own. They are getting easier to build, finish and size. Good candidate for a 5+" flat brim here as I continue forming it to my long oval head and re iron the brim. But starting to loose my string line/crown break and really don't want to screw this one up with my home made rounding jack and loose any of the brim size i have now. So loosing the string line and being unable to sew in the sweat band or put on the hat band until the hat is cut. Project is on hold till the rounding jack arrives. Gives me time to make a proper flat hat that is actually "almost flat" on my head. No expecting miracles but I'm happy with the start and where I am at.

Sweat band is in the hat but not sewn and I have ironed the brim twice since it was fired. More ironing after I cut the brim. You can see I am starting to get the flip out of front and back that are forced on the hat by my really round oval head shape. I have an idea for a leather hat band but also might try a real gaudy hitched horse hair band to match my horses.

This one will have a very mild..and close to flat front with a slight flip up in back. No edge binding and no pencil curl. Might do a back half curl once I ma done. As close as I can tolerate or may be actually accomplish to a old Vaquero style hat. Pretty much what you are seeing will be the end result when I am done and hopefully a full 5.25" brim (it is a uneven 5 3/8" to 5 1/2" now). We'll see how it finishes up!


I'll post again when the rounding jack arrives and show you the cut.
 

Yahoody

One Too Many
Messages
1,110
Location
Great Basin
Ok I admit it I am a "little" obsessive. Don't have the best rounding jack. Have little patience but have a really nice beaver blank that is almost done. As I said previous lots of ways to build a good hat. Measured and re-measured the brim width. A pretty consistent 5 3/8 to 5 1/2" in brim. Hat is dang near wearable as is because the blank was so uniform on the edges.

Although I have done something similar to clean up hats a coupel of times this is not something I would recommend first time out on a nice hat blank. But here goes.

I took a new utility knife blade and after measuring again decided if I could just even the edge out with a blade and then sand with a 220 on a good size sanding block I would be very close to symetrical on the brim. Risky business that.

A death of 50 cuts?

50 or so small razor cuts and the hat was looking better on the brim edge. Not something you want to screw up when looking for the magical 5"+ brim. I was trying to think, "small cuts for a BIG round shape" ;)

Each piece of felt represents a "wowie" in the hat brim. Easy to see and not that hard to cut out with a sharp blade.


Next up was 240 grit on a gently curved sanding block. I made 4 light passes at the brim edge keeping the sanding block at a 90 degree angle to the brim edge. The brim was coming out more symmetrical with each time around the edge.


The rippled beaver fuzz is midway through the edge sanding process. Couple of more passes here and then back to the iron again for a flat hat. Hat is resting now (relaxing the felt from the stress of heat/water/steam) with a my head shaped hat form in place after another bought with the iron and steam.

So we are back on track. Hat is still being shaped to my head shape and still being ironed flat with the long oval sizing block in place. One more inspection and may be another iron with steam. After that it is time to sew that leather sweat band in I think! Lot of ways to work around anything while making a hat I suspect. This is just one way to do it. Rounding jack is a lot less stressful and a lot quicker :)

If i can't notice any thing wrong with the brim edge or the symmetry of the hat no one else will. I'll be wearing this one tomorrow if I can come up with a hat band I like.


Look for the dude n the big Appy with the flat really hat!
 
Last edited:

Yahoody

One Too Many
Messages
1,110
Location
Great Basin
... my question: steam ironing, what temp setting do you use for wet or dry felt and do you always use steam?
Look forward to your next installment.

Hi Bowen! Glad you are enjoying it.

I always use steam along with the iron set on high wet or dry. More stream than ironing really. I have a thumb pump on the iron and I just keep pumping puffs of steam as I run the iron around. The key here is keeping a layer of material between the iron and the hat. I use a fine cotton apron or a tea towel of my wife's. But what ever you do, never ever hit the felt directly with an iron. Heat is tough on felt. Steam too. So you always want one degree of separation to save the felt long term.
 

Yahoody

One Too Many
Messages
1,110
Location
Great Basin
Sweat band is sewn in. I like undyed leather because it will never bleed the dye or loose the finish that protects the dye. Big plus however is it absorbs moisture better than the "fancy" dyed hat bands you see in most custom western hats. BIG plus here for me to pick my own leather after years of thinking the best is what we were getting in a nice beaver custom hat.

If you want to test you hat band thinking you have the real chit..try wiping it with a rag soaked in rubbing alcohol. Seriously don't do it because you'll wreck the hat band on most expensive hats. Won't happen on this one. So no worries when ya get carried away and spill a bottle of jack on your hat :) You are still good to go with undyed leather!

You can imagine just how I figured out dyed and finished sweat bands aren't all they say they are.

Also a great look at my egg shaped long, long oval head.


Still working on the shape. I've found the most simple shapes are actually the hardest hats to build. It is looking good in hand and staying mostly flat at the moment.


Mostly flat...more ironing, steam and time required. Trying to get the felt to have a memory while still keeping my head shaped fitting block (not the big wooden hat block) in the hat. I am likely the bright red, flesh side of the latigo leather I split for a hat band though. Nice contrast on the natural beaver color. What do you thin of the combo?


Put it on my head though and instant head shaping going on. Back to a dip front and back. Just not as much. Add some moisture or rain and the shape would fall apart. Say hello to "plow boy's" hat if that happens too early after molding and shaping. Not much happening here thankfully but the hat is still very much alive and moving. Couple of days ironing it off and on, wearing it for short periods and keeping it blocked flat and with a head block in the hat will make a big difference.

Only the silk liner is missing. They drop in and are held there by the sweat band. I don't glue them in as most do. I want to be able to change then easily. Cheap part..$4 or 5 per liner that keeps the inside your hat clean. Why not just change them out as the hat gets worn? Sure protects your hat long term!

I skipped over all the sewing. Figured that is easy enough to figure out and hard to screw up.

I am convinced a truly hand made hat like what I have shown here is better and more durable than anything you can buy today. Much easier to rebuild as well. Likely a lot closer hat to what to J.B. Stetson's original hats that anything made commercially in the last 100 years.

If you have any questions or comments on how you do it or would like to try it please comment.

All done..thanks for stopping by!

 
Last edited:

RJR

Messages
10,620
Location
Iowa
Sweat band is sewn in. I like undyed leather because it will never bleed the dye or loose the finish that protects the dye. Big plus however is it absorbs moisture better than the "fancy" dyed hat bands you see in most custom western hats. BIG plus here for me to pick my own leather after years of thinking the best is what we were getting in a nice beaver custom hat.

If you want to test you hat band thinking you have the real chit..try wiping it with a rag soaked in rubbing alcohol. Seriously don't do it because you'll wreck the hat band on most expensive hats. Won't happen on this one. So no worries when ya get carried away and spill a bottle of jack on your hat :) You are still good to go with undyed leather!

You can imagine just how I figured out dyed and finished sweat bands aren't all they say they are.

Also a great look at my egg shaped long, long oval head.


Still working on the shape. I've found the most simple shapes are actually the hardest hats to build. It is looking good in hand and staying mostly flat at the moment.


Mostly flat...more ironing, steam and time required. Trying to get the felt to have a memory while still keeping my head shaped fitting block (not the big wooden hat block) in the hat. I am likely the bright red, flesh side of the latigo leather I split for a hat band though. Nice contrast on the natural beaver color. What do you thin of the combo?


Put it on my head though and instant head shaping going on. Back to a dip front and back. Just not as much. Add some moisture or rain and the shape would fall apart. Say hello to "plow boy's" hat if that happens too early after molding and shaping. Not much happening here thankfully but the hat is still very much alive and moving. Couple of days ironing it off and on, wearing it for short periods and keeping it blocked flat and with a head block in the hat will make a big difference.

Only the silk liner is missing. They drop in and are held there by the sweat band. I don't glue them in as most do. I want to be able to change then easily. Cheap part..$4 or 5 per liner that keeps the inside your hat clean. Why not just change them out as the hat gets worn? Sure protects your hat long term!

I skipped over all the sewing. Figured that is easy enough to figure out and hard to screw up.

I am convinced a truly hand made hat like what I have shown here is better and more durable than anything you can buy today. Much easier to rebuild as well. Likely a lot closer hat to what to J.B. Stetson's original hats that anything made commercially in the last 100 years.

If you have any questions or comments on how you do it or would like to try it please comment.

All done..thanks for stopping by!

Thanks for the building "trip",very interesting.
 

Cornshucker77

Call Me a Cab
Messages
2,691
Location
Northeast Nebraska, USA
Ironed again last night. Wore it around and watched the brim "melt". Stuck my head block in and let it rest over night. Much better this morning. Burnt and vacuumed the top again for good measure. Smokey the Bear look :)


my foam "head" insert in place

Hey Yahoody, enjoying the trip, thanks again. I also bought the hat building book you mentioned. In the book the author uses a home made conformator(Sp ?) and makes a head shaped block from......redwood? Made of course to get the hat to take the shape of the head for a better fit. Have you ever tried something like that?
 

Forum statistics

Threads
107,269
Messages
3,032,608
Members
52,727
Latest member
j2points
Top