Want to buy or sell something? Check the classifieds
  • The Fedora Lounge is supported in part by commission earning affiliate links sitewide. Please support us by using them. You may learn more here.
Messages
18,936
Location
Central California
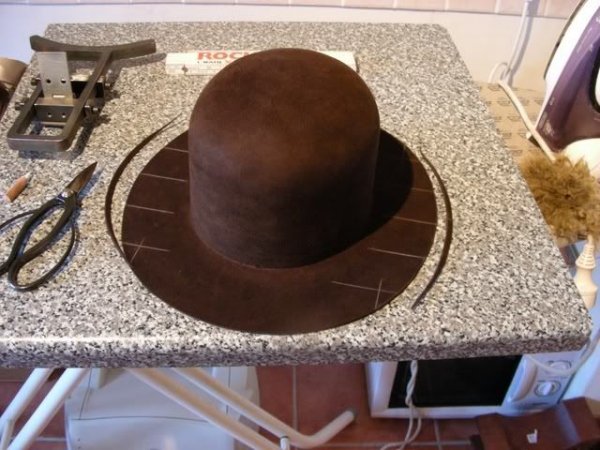
Here is a work in progress. It is one for my wife. The brim will be stiffened with shellac, and then a pencil curl. Thinking of something interesting for the bash....asymmetrical? I am using light weight fur felt (Czech) but millinery seconds that cost me $10 landed. Lots of room to screw up at that price. View attachment 255126 View attachment 255127


I really like the “bow.” I could also see it working on a mens boater style hat.
 
Messages
10,392
Location
vancouver, canada
Got it! What would you consider as a decent sized reservoir then? Would around 450ml be good?
Yes, I think that is on the larger side. If you get one with a smaller res it is not a deal breaker but it can get annoying having to refill it so often. i use both an iron and a Rowenta hand steamer. The hand steamer works really well but the res is small and it produces lots of steam and runs dry quickly. But for the $50 I paid I am willing to live with the inconvenience. One day when I am wealthy(er) I may buy a better one.
 
Messages
10,392
Location
vancouver, canada
Here is the finished hat I made for my wife. Now she says I have to take her out and buy her a new outfit to wear with it.....I may have not thought this thing through real well. I used the $10 Tonak seconds and with a bit of shellac it turned out okay. Not a bad hat for about $30 total. Not something to hand down to your children but def better (and cheaper) than Mall quality.
CIMG1971.JPG
CIMG1972.JPG
 

KarlEscobar10

New in Town
Messages
24
Here is the finished hat I made for my wife. Now she says I have to take her out and buy her a new outfit to wear with it.....I may have not thought this thing through real well. I used the $10 Tonak seconds and with a bit of shellac it turned out okay. Not a bad hat for about $30 total. Not something to hand down to your children but def better (and cheaper) than Mall quality. View attachment 255813 View attachment 255814
beautiful! what grits of sand paper do you use when pouncing if you don't mind me asking? I read 800 grit and 1000 grit is needed, is that right?
 
Messages
10,392
Location
vancouver, canada
beautiful! what grits of sand paper do you use when pouncing if you don't mind me asking? I read 800 grit and 1000 grit is needed, is that right?
Yes, depending on the felt I am using. If I am working with beaver felt I work up from 600 to the 1000 and a finish with the white abrasive pad as a polish. The grey hat in the picture is very very soft almost delicate felt so I had to use a very very light touch even with the 1000 grit. It is still shedding a bit and I don't think I pounced it enough but I feared doing too much.
 

KarlEscobar10

New in Town
Messages
24
Yes, depending on the felt I am using. If I am working with beaver felt I work up from 600 to the 1000 and a finish with the white abrasive pad as a polish. The grey hat in the picture is very very soft almost delicate felt so I had to use a very very light touch even with the 1000 grit. It is still shedding a bit and I don't think I pounced it enough but I feared doing too much.
Ahh got it! I didn't know hats were finished with a white abrasive pad, thanks so much for this tidbit!
 

KarlEscobar10

New in Town
Messages
24
I wasn't sure so I emailed Art and he confirmed it was the abrasive pad.
that's awesome he's accessible like that! good to know there's people willing to help out in this lounge! I've just bought my basic wooden hat tools, I'm now planning to buy steamers and hat bodies so I can start practicing, can't wait to get started!
 
Messages
10,392
Location
vancouver, canada
that's awesome he's accessible like that! good to know there's people willing to help out in this lounge! I've just bought my basic wooden hat tools, I'm now planning to buy steamers and hat bodies so I can start practicing, can't wait to get started!
Where are you sourcing your felts? There is a millinery shop in the UK....The Trimming Company. They sell millinery quality, light weight, flawed/seconds felts for $10. I have a bunch of them that I plan to use to practice. They definitely need shellac but for $10 you can't beat the price and the flaws on some are not noticeable or only slightly.
 

KarlEscobar10

New in Town
Messages
24
Where are you sourcing your felts? There is a millinery shop in the UK....The Trimming Company. They sell millinery quality, light weight, flawed/seconds felts for $10. I have a bunch of them that I plan to use to practice. They definitely need shellac but for $10 you can't beat the price and the flaws on some are not noticeable or only slightly.
Ooh are those wool or fur felts? will look them up! I was going to go for Agnoulita's standard wool felts (around $10 as well) as they're the ones that seem affordable for me now and probably good for practice, what do you think?
 
Messages
10,392
Location
vancouver, canada
Ooh are those wool or fur felts? will look them up! I was going to go for Agnoulita's standard wool felts (around $10 as well) as they're the ones that seem affordable for me now and probably good for practice, what do you think?
No, these are fur felt...I think from Tonak. They are just light weight for the millinery market but they took the shellac really well. I strongly suggest if you want to learn to make a fur felt hat you need to work on fur felt. I would skip the wool.
 

KarlEscobar10

New in Town
Messages
24
No, these are fur felt...I think from Tonak. They are just light weight for the millinery market but they took the shellac really well. I strongly suggest if you want to learn to make a fur felt hat you need to work on fur felt. I would skip the wool.
I just saw their site and I’m definitely considering them! Especially since it’s fur felt and the price is the same as wool. May I ask at what part of the process do you apply the shellac to the hat? Is it at the end?
 
Messages
10,392
Location
vancouver, canada
I just saw their site and I’m definitely considering them! Especially since it’s fur felt and the price is the same as wool. May I ask at what part of the process do you apply the shellac to the hat? Is it at the end?
Yes, I curled the brim to see if that would give enough support and it did not. So I finished the hat, including the ribbon work and the last thing I did was brush a very thin coat of very thin shellac. Let it dry overnight, was not stiff enough and gave it another coat. It still has some softness to it...def not western stiff but will hold its shape now. Only the brim was shellac coated not the crown and not the brim curl.
 

KarlEscobar10

New in Town
Messages
24
Yes, I curled the brim to see if that would give enough support and it did not. So I finished the hat, including the ribbon work and the last thing I did was brush a very thin coat of very thin shellac. Let it dry overnight, was not stiff enough and gave it another coat. It still has some softness to it...def not western stiff but will hold its shape now. Only the brim was shellac coated not the crown and not the brim curl.
Got it! Thanks so much you’ve been sooo helpful! Can’t wait to complete the necessary materials so I can get started!
 

crhIndyfan

New in Town
Messages
16
Hello all. I wonder if anyone would be able to explain to me the exact measurements that can be seen marked in this attached image. I am interested to know how one would trim the sides of a brim correctly to make the brim dimensional. This image has been pulled from the making of an Adventurebilt. I hope Adventurebilt can humour me using it. I am particularly interested to know how exactly one would calculate where to mark these lines on the brim in preparation for cutting the sides and thus making the hat brim "dimensional."

This question refers directly to the Indiana Jones-style fedoras, but I think it is relevant to this thread as I have read the whole thing through and there is definitely some Indy interest here. I am really interested in cutting the sides of my hat right, and as accurately as possible, and I'm really not into the modern Fouquet-style fashion where there doesn't seem to be any of that old-timey methodology involved and everything is created shabby-chic from the off. Though some do dig this look.

A member of the community mentioned that I should calculate the brim's circumference first with an ellipse circumference calculator. But what I am really keen to know is where to physically make the marks in chalk on the brim and their measurements, to correctly cut the sides from 2 7/8 to 2 5/8. And apologies if I do not reply instantly, it really would help if this forum was back on the Tapatalk app aha.

Anyways, here is the photo I found that begun this little complex of mine. Many thanks
 

Attachments

  • DSCN0292.jpg
    DSCN0292.jpg
    61.4 KB · Views: 394
  • Chalk Lines to Mark the Dimensional Brim.jpg
    Chalk Lines to Mark the Dimensional Brim.jpg
    61.4 KB · Views: 434

humanshoes

One Too Many
Messages
1,428
Location
Tennessee
Hello all. I wonder if anyone would be able to explain to me the exact measurements that can be seen marked in this attached image. I am interested to know how one would trim the sides of a brim correctly to make the brim dimensional. This image has been pulled from the making of an Adventurebilt. I hope Adventurebilt can humour me using it. I am particularly interested to know how exactly one would calculate where to mark these lines on the brim in preparation for cutting the sides and thus making the hat brim "dimensional."

This question refers directly to the Indiana Jones-style fedoras, but I think it is relevant to this thread as I have read the whole thing through and there is definitely some Indy interest here. I am really interested in cutting the sides of my hat right, and as accurately as possible, and I'm really not into the modern Fouquet-style fashion where there doesn't seem to be any of that old-timey methodology involved and everything is created shabby-chic from the off. Though some do dig this look.

A member of the community mentioned that I should calculate the brim's circumference first with an ellipse circumference calculator. But what I am really keen to know is where to physically make the marks in chalk on the brim and their measurements, to correctly cut the sides from 2 7/8 to 2 5/8. And apologies if I do not reply instantly, it really would help if this forum was back on the Tapatalk app aha.

Anyways, here is the photo I found that begun this little complex of mine. Many thanks
Back in the day, they had a simple, yet elegant method to achieve perfect dimensional brims. This from Henry Ermatinger's "Scientific Hat Refinishing and Renovating" book.


Dimensional Brim Strap.jpg
 

Forum statistics

Threads
107,269
Messages
3,032,597
Members
52,727
Latest member
j2points
Top