How To Paint On A Leather Jacket, Part 2: Getting ready/Creating Your Stencil
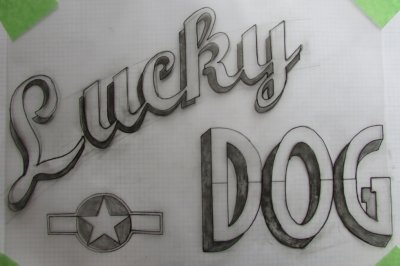
So my first design for Lucky Dog (on paper) ...
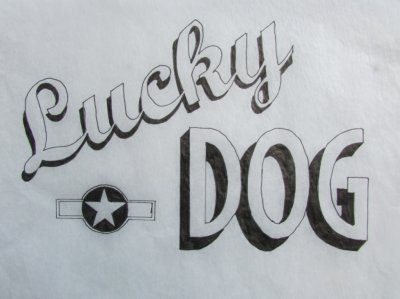
But - suddenly- I was unhappy with the “L” and felt that it needed to be bigger … and I didn't like that the "Lucky" was angled but straight - I wanted it angled and curved - like Shack Rabbit. And I wanted it larger overall.
So I re-worked it for the third time!
Let's get to business.
Get your paints and art supplies
I would point out here that there are two steps to cover: the design side of things and the painting side.
I would first suggest that you just get the design-side supplies first and try making your design and see how that goes first. Perhaps it doesn't come together as you'd imagined and it just doesn't look right as you'd planned/hoped? If so, there's no wasted money on paints and mediums. So head on down to your local art shop and get what you need ...
The Design work will need:
Graph-Layout paper
Rulers - straight (perhaps with a T-square on the end) and perhaps curved/flexible if you require one.
Mechanical pencil (0.5mm)
Erasers (with a point)
(Cephalometric) Tracing paper/Acetate sheets
0.3mm, 0.5mm and 0.7mm permanent drawing pens
The painting work will need:
A piece of hardboard upon which to mount/zip your jacket around and keep your back panel flat (hardware store for that)
A stretched canvas - if you want to experiment and have a dry-run - or make some wall art!
Artist paints: Acrylics and/or oil paint
Artist paint brushes
Tension Breaker/Flow Improver/Retarder (for acrylics) or Oil Painting Medium I (for oils)
Varnishes (matt/satin)
A mixing palette/pad or white tile
Q-Tips
Create a stencil
So make your design - I suggest graph-layout paper for this as it will help you keep your vertical lines vertical and you horizontal ones horizontal. It all helps.
Having made your design, you will then need a stencil to work from.
A stencil is a guide that you will make and one that represents your final work and that you will work from on your jacket. With just a few good quality permanent-ink design pens and a ruler, you can draw it on a piece of paper to make your original design.
From that you can trace it and make your stencil – using tracing paper, or much better still, a sheet of clear acetate (that you used to see at school/college for OHP presentations. Remember those before PowerPoint?!). In this instance, I’m using some Cephalometric Tracing Paper acetate sheets. Cheaper than art supply store equivalents, it can be obtained online from dental supply companies (e.g. Bracon Dental in the UK, TP Orthodontics in the USA) in pads. Just Google it. It’s what I used to use at work in another hospital for all their pre-surgical orthognathic surgical planning for the dental surgeons - meaning I would mark all the anatomical landmarks on skull x-rays and trace their pre- and post-surgical relationships for jaw reconstruction planning. So you can see that all this isn't a million miles different from that - except now all that is done on computers, so that's seriously old school. With your design neatly laid out on it, you will be able to carefully place it on your jacket, fixing just one side with masking tape so that it is fixed and doesn't move too much - and then you will be able to turn it back and forth like a page - like the old animators used to - so you can lift it back to add paint, then accurately locate it back in place and see through it and see what you are doing on the jacket itself and see your progress.
Spend time making as neat a stencil as possible – it will be your essential guide and you will rely on its accuracy to the Nth degree. After all, why mark anything on a stencil if you aren’t going to follow it precisely? So invest some time in making it as accurate as you can. If you make a mistake, try correcting it or start afresh on another sheet - but make it accurate! (so you'll need a good number of sheets to allow for mistakes - hence get a pad of sheets, not one single piece from an art store which will be expensive).
N.B. Do note that a little imperfection or irregularity is fine in your finished work. If you look at original A2s and their jacket art, they aren’t perfect as they were done by hand and by amateurs. These days, professionally rendered jacket art - like that on Buzz Ricksons A2s - can be that bit too neat (to me) and look like a decal (even though it isn’t) and may not quite have the desired effect you’re after.
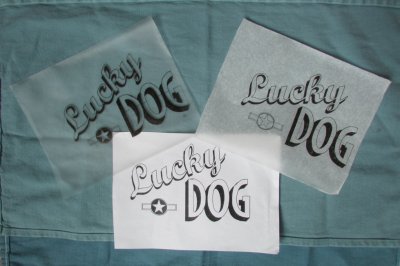
The Lucky Dog design on an acetate sheet, a sheet of tracing paper and on paper - to show you how different they are and you can determine your own preference. I used to use tracing paper - now I prefer acetate.
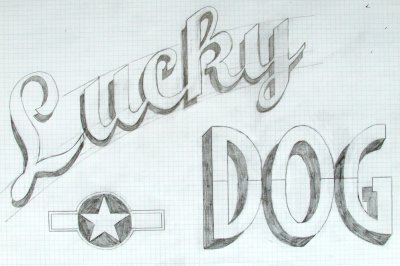
The final draft of Lucky Dog as seen on the layour/graph paper.
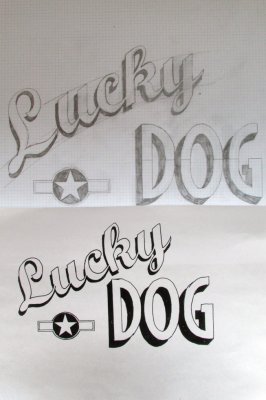
Here you can see the difference between the first and second draft of my design.
The stencil being drawn up - the acetate sheet being fixed in position over the graph paper with masking tape.
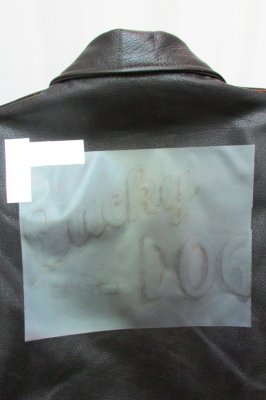
And the finished template set on the jacket - making sure it is central and horizontal!
So when you're happy with your stencil, then we can move on - to the painting!
End of Part 2.
So my first design for Lucky Dog (on paper) ...

But - suddenly- I was unhappy with the “L” and felt that it needed to be bigger … and I didn't like that the "Lucky" was angled but straight - I wanted it angled and curved - like Shack Rabbit. And I wanted it larger overall.
So I re-worked it for the third time!
Let's get to business.
Get your paints and art supplies
I would point out here that there are two steps to cover: the design side of things and the painting side.
I would first suggest that you just get the design-side supplies first and try making your design and see how that goes first. Perhaps it doesn't come together as you'd imagined and it just doesn't look right as you'd planned/hoped? If so, there's no wasted money on paints and mediums. So head on down to your local art shop and get what you need ...
The Design work will need:
Graph-Layout paper
Rulers - straight (perhaps with a T-square on the end) and perhaps curved/flexible if you require one.
Mechanical pencil (0.5mm)
Erasers (with a point)
(Cephalometric) Tracing paper/Acetate sheets
0.3mm, 0.5mm and 0.7mm permanent drawing pens
The painting work will need:
A piece of hardboard upon which to mount/zip your jacket around and keep your back panel flat (hardware store for that)
A stretched canvas - if you want to experiment and have a dry-run - or make some wall art!
Artist paints: Acrylics and/or oil paint
Artist paint brushes
Tension Breaker/Flow Improver/Retarder (for acrylics) or Oil Painting Medium I (for oils)
Varnishes (matt/satin)
A mixing palette/pad or white tile
Q-Tips
Create a stencil
So make your design - I suggest graph-layout paper for this as it will help you keep your vertical lines vertical and you horizontal ones horizontal. It all helps.
Having made your design, you will then need a stencil to work from.
A stencil is a guide that you will make and one that represents your final work and that you will work from on your jacket. With just a few good quality permanent-ink design pens and a ruler, you can draw it on a piece of paper to make your original design.
From that you can trace it and make your stencil – using tracing paper, or much better still, a sheet of clear acetate (that you used to see at school/college for OHP presentations. Remember those before PowerPoint?!). In this instance, I’m using some Cephalometric Tracing Paper acetate sheets. Cheaper than art supply store equivalents, it can be obtained online from dental supply companies (e.g. Bracon Dental in the UK, TP Orthodontics in the USA) in pads. Just Google it. It’s what I used to use at work in another hospital for all their pre-surgical orthognathic surgical planning for the dental surgeons - meaning I would mark all the anatomical landmarks on skull x-rays and trace their pre- and post-surgical relationships for jaw reconstruction planning. So you can see that all this isn't a million miles different from that - except now all that is done on computers, so that's seriously old school. With your design neatly laid out on it, you will be able to carefully place it on your jacket, fixing just one side with masking tape so that it is fixed and doesn't move too much - and then you will be able to turn it back and forth like a page - like the old animators used to - so you can lift it back to add paint, then accurately locate it back in place and see through it and see what you are doing on the jacket itself and see your progress.
Spend time making as neat a stencil as possible – it will be your essential guide and you will rely on its accuracy to the Nth degree. After all, why mark anything on a stencil if you aren’t going to follow it precisely? So invest some time in making it as accurate as you can. If you make a mistake, try correcting it or start afresh on another sheet - but make it accurate! (so you'll need a good number of sheets to allow for mistakes - hence get a pad of sheets, not one single piece from an art store which will be expensive).
N.B. Do note that a little imperfection or irregularity is fine in your finished work. If you look at original A2s and their jacket art, they aren’t perfect as they were done by hand and by amateurs. These days, professionally rendered jacket art - like that on Buzz Ricksons A2s - can be that bit too neat (to me) and look like a decal (even though it isn’t) and may not quite have the desired effect you’re after.

The Lucky Dog design on an acetate sheet, a sheet of tracing paper and on paper - to show you how different they are and you can determine your own preference. I used to use tracing paper - now I prefer acetate.

The final draft of Lucky Dog as seen on the layour/graph paper.

Here you can see the difference between the first and second draft of my design.

The stencil being drawn up - the acetate sheet being fixed in position over the graph paper with masking tape.

And the finished template set on the jacket - making sure it is central and horizontal!
So when you're happy with your stencil, then we can move on - to the painting!
End of Part 2.
Last edited:


