Want to buy or sell something? Check the classifieds
  • The Fedora Lounge is supported in part by commission earning affiliate links sitewide. Please support us by using them. You may learn more here.

How To Paint On A Leather Jacket 101, Part 4: The theory #2

Stand By

One Too Many
Messages
1,741
Location
Canada
So here we are at our last stop before we get busy and take an indelible step forward ...
Up to now, it's all been quite exciting and fanciful wishful thinking - but harmless. And we're about to cross that threshold, so I thought I'd add just a few final words on painting before we do that, so that you, gentle reader, may feel as prepared as possible.

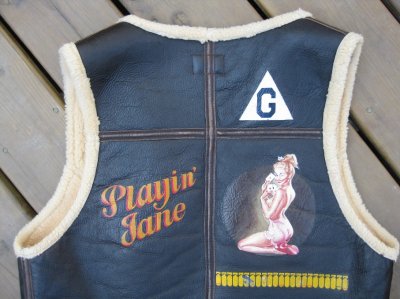
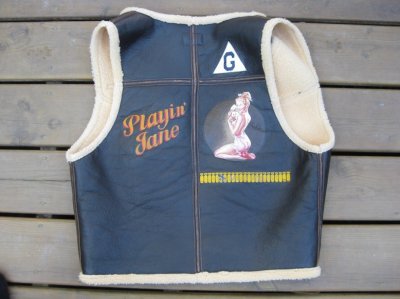
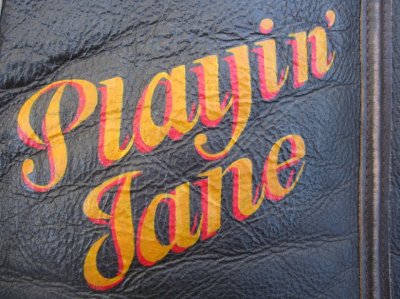
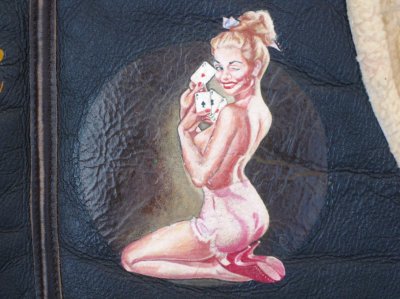
As I said, here's Playin' Jane as seen on my ELC C-3.
Playin'Jane.JPG Playin'Jane2.JPG ELCC-3#1.JPG ELCC-3#3.JPG

Again, the flesh tones were done in oils.

Get good quality artist brushes - from an art shop, not a hobby store. There's a big difference in quality and a poor brush will hamper your ability to pull this off. And if you invest in good quality brushes and paints, with dutiful care, they can last for future projects.
Your canvas is the rear panel of your jacket and, like any canvas, it needs to be held flat and taught - so get a piece of hardboard or ply-wood of an appropriate size on which you can put your jacket on and then zip it up on the other side to make it snug so it won't move. The one I use is 18” x 24”.
Then you are going to tape your stencil to the back panel, making sure it is placed precisely where you want it and at the correct rotation - and then very gently and lightly rub the precise area to be painted with some fine sandpaper just to prep the surface and give it a little "tooth" - and brush away any debris. Alternatively, clean the area to be worked on with just a little alcohol - just a wee bit! One pass is all I'm talking about. Do not use acetone - it's far too harsh and will remove the colour of the tanning as well as everything else! So very carefully does it and you are ready to go.

And then comes the very hardest part: putting that first touch of the brush and the paint to the jacket!
Up to that point, it's all just been quite exciting dreaming and planning and design and prep work - and you could always change your mind about it all with no harm done.
But committing that first paint stroke ... I do say it requires a certain leap of faith and - and yes, you could be about to ruin your jacket.
But you won't know if you don't try!

But what's the worst that can happen?
If it all looks wrong, just keep painting over and correcting what you've done until it looks right. Don't give up at the first fallen fence. Have another run at it.
A long time ago and after making models for many years (since I was 6) and developing my skills, I once made a Tamiya 1/350 Bismarck battleship and made a truly terrible job of the splinter camouflage. It totally surprised me - I thought it was a challenge that was well within my abilities. It looked really awful to me - and I really thought my modelling mojo had suddenly upped and gone. Seriously, I did. I was gutted. But the kit was expensive to me and so I took a deep breath and a good step back. I stripped all of the paint back to the bare plastic, carefully sanded everything smooth and re-primed and had a fresh crack at it - and I astonished myself as it turned out beautifully! I couldn't believe that the second run was as good as the first one was terrible. Such is the power of patience and perseverance! Had I not tried again, I would have given up there and then and have decided that that was my limit of ability - which it certainly was not!
But that said, if it looks disappointingly bad in the end and the job appears to be more than you're capable of, you can always pass the job on to an artist to paint over ... but you may just astonish yourself, as I did with Stand By!
"Baby steps" suggestion: You could always start by testing your painting abilities with just attempting a name in a nice 1940s/1950s/military font with a couple of the colours you like - keeping it simple - and you could always have a test-run on a piece of stretched canvas in a wood frame from an art store. They are cheap and canvas has a nice grain somewhat similar to goatskin. Just paint on a white base and add a few coats of brown in a matching tone to your jacket and it will look like your jacket's back panel - and paint on that as a safe dry-run. And if it turns out well, you'll have a nice piece of wall art! (and one that could go in a bathroom like my Stand By. No amount of steam from the shower can make it warp!). But bear in mind that your commitment level will be less with a stretched canvas - if you think things aren't going well, you might decide to quit earlier as there's less incentive to keep going and try harder ... But it could be a case of better safe than sorry. Only you can know.

Note that painting on horsehide gives you a superbly smooth canvas to paint and work on.
Steerhide is almost as fine and is just as good for this. The patch below of the 729th BS was made on a piece of my old Aviation Leathercraft A2 and is on my girlfriend's ELC C-3. As you can see, it's a good way to get a neat patch on to an otherwise rough hide like sheepskin.
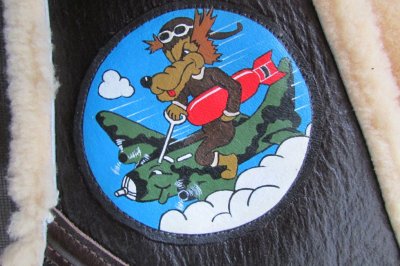
729thBSpatch.JPG

Goatskin is naturally pebbly by nature and is slightly more challenging and makes fine work look a hint less straight in fine detail, but as original goatskin A2s were painted, so can yours be. It shouldn't stop you by any means.
Sheepskin, however, has a lot more texture and offers extra challenges to get straight lines looking straight - and I can't recommend it. The 364th BS patch below has worn appreciably due to the texture of the hide.
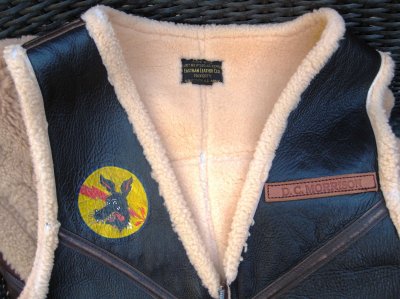
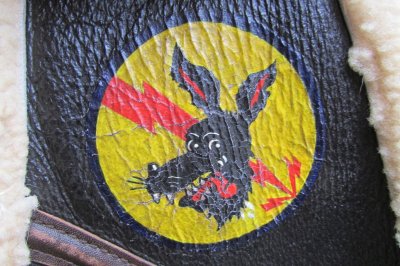
ELCC-3#4.jpg 364thBSpatch.JPG

So, that's the theory all done.
Now to the practical part - and painting on the jacket!

End of Part 4.
 
Last edited:
navetsea

I'll Lock Up
Messages
6,818
Location
East Java
Awesome guide! thank you for sharing

BTW

How to transfer your sketch guide onto the jacket surface, white/ yellow carbon paper?

what kind of brushes sizes and shapes should we buy to make neat lines, or calligraphy effect nicely?

how do you test when the oil paint have dried properly before sealing ?

I'm a total klutz when it comes to traditional wet media
I will never dare to do it on a jacket, but I want to try on a keychain, and my diy wallet :)
 

Stand By

One Too Many
Messages
1,741
Location
Canada
You're welcome.
Transferring the design from the template to the jacket is something I demonstrate in the next instalment …!

The brushes I use are by Windsor & Newton and are the ones designed for Oil/Acrylic. Make sure you get brushes for oil/acrylic. I like the University series - they are easy to spot on a rack as they are red, but any brand of quality art supply company will do.
Like paints, the art companies make brushes for students and professionals - and I suggest that you spend a little more and get the better quality brushes.
I use everything from a 000 (superfine) to a 4 (thicker). I also use a 1/4 flat brush for adding a coat of varnish at the end. My staple brushes that do most of the work are 1's and 2's. But if you look back at the little black stars on the thing that the lady is wearing in the close-up detail of Stand By (what is that thing called?! I have no idea!), they were done with a 000 and using Flow Improver - to give me a nice, hard edge to the fine detail.

How do you know when oil paint is dry?
After a few days, take a clean and dry brush and try drawing it across your work. It may move, so it is still wet - or it may not move but be tacky. Then it's still wet.
When it doesn't move and you feel no tackiness - it is dry. BUT - it should not be considered fully dry as it will need to develop a full cure and a shell hardness. I'd leave it at least a week after that.
Note: You may notice that the bomb tally row at the bottom of Playin' Jane is very worn - and the paint has come away and the yellow paint removed and you can see the white base beneath that … that was an accident. I finished the art and had left it a couple of weeks - and then I flew back to England and the vest came with me as it was going to ELC to have the name tag put on it and I was going to post it from my destination in Cardiff - and I folded it and put it in my checked bag for the flight, thinking no more about it.
I got to Cardiff and opened my bag and discovered with HORROR that the paint had stuck to itself - where the opposing halves had met and been pressed together by the weight of other bags in the hold. I pried it apart gently and that was the result - so clearly, acrylic paint takes a few weeks to achieve a full cure - one that can withstand that, anyway! I mailed the C-3 with tissue paper to protect the art and ELC kindly returned the tagged C-3 with plenty of tissue paper to make sure that no further accidental damage could occur.
I was initially aghast at what had happened … but looking more at it, I actually liked the accidental "aging" effect! Lucky for me though that the "damage" was confined to the bomb tallies …
So care should be taken for a few weeks before exposing any art to any abuse/weather/packaging/mailing.
 

foamy

A-List Customer
Messages
364
Location
Eastern Shore of Maryland
Nice work and tutorial! Glad I stumbled on to this. Looks like fun.

Your insistence on taking care of your brushes is accurate. I still have and use (quite a bit) at least two Delta Red Sable's from when I was in high school (early '70's). Do not put a brush in a jar or glass—it'll golf-club on you in nothing flat and it won't go back go being straight—ever.

How did you decide to use oils and/or acrylics? Is that what was used on jackets in WWII? Just wondering as my first thought would have been One-Shot (or similar) sign paint.
 

Stand By

One Too Many
Messages
1,741
Location
Canada
Nice work and tutorial! Glad I stumbled on to this. Looks like fun.

Your insistence on taking care of your brushes is accurate. I still have and use (quite a bit) at least two Delta Red Sable's from when I was in high school (early '70's). Do not put a brush in a jar or glass—it'll golf-club on you in nothing flat and it won't go back go being straight—ever.

How did you decide to use oils and/or acrylics? Is that what was used on jackets in WWII? Just wondering as my first thought would have been One-Shot (or similar) sign paint.

Thanks Foamy!
And you're quite right about the brushes. As my dad used to say: "Buy cheap, buy twice!".
As I said in Part 1, I was told by the ladies at the art shop back in 1993 to use acrylics and oils … so I did! And I have ever since … I was a whizz with enamels for my kits, but had never used acrylics at all and oils only once at school (and miserably at that. Not an inspiring result to say the least!) - so I was feeling very daunted by the prospect, I'll admit - heading out of my comfort zone and taking a risk with my jacket. But I just knew that I couldn't get the result I wanted for Stand By (even flesh tones, the smoke looking blended nicely and without brush marks etc.) with enamels - they'd set on me far to quickly - so I needed another solution - and oils were it!
As I also said in Part 1, back in WW2, the aircraft and jackets were done with oil-based paints ...
I've not heard of One-Shot paint - I'll look it up … thx!
 
Last edited:

foamy

A-List Customer
Messages
364
Location
Eastern Shore of Maryland
Thanks, Stand By. Located the other two parts after I posted on #3. Cool threads and nice art.

I'm a pin-up fan boy. I like most all of the old painters/illustrators, but Gil Elvgren (of course) is my favorite.
 

Stand By

One Too Many
Messages
1,741
Location
Canada
Thank you kindly, Foamy!

And I agree with you about Gil Elvgren! He was the best of the pin-up genre, IMO.
 

navetsea

I'll Lock Up
Messages
6,818
Location
East Java
thanks Stand By, your accidental event on those bombs looks natural and adding coolness factor that probably not so easy to replicate intentionally.
in local DIY shop here there is Krylon document save clear coat for pencil drawing, portrait and stuff in aerosol spray... is it save to use that instead of brushing the varnish? any + or - for both aplications

thanks again :)
 

Stand By

One Too Many
Messages
1,741
Location
Canada
thanks Stand By, your accidental event on those bombs looks natural and adding coolness factor that probably not so easy to replicate intentionally.
in local DIY shop here there is Krylon document save clear coat for pencil drawing, portrait and stuff in aerosol spray... is it save to use that instead of brushing the varnish? any + or - for both aplications

thanks again :)


Thanks - I know, it was purely accidental and it looks authentic - and to try and replicate it again would probably make it look fake and contrived! :)

As for Krylon, it's a decent brand that makes good varnishes that I use here at work and on other art works - but I wouldn't recommend it for jacket art. It yellows with age for one thing. Also, I've only used it on hard objects such as acrylic moulds - and their fixative sprays on pencil drawings to seal them.
Would Krylon flex with the leather without cracking? That's the question.
Plus, because you'd be spraying it from a can, you'd need to do a good masking job around your art to protect the rest of the back panel - and that could be tricky with a name full of individual letters … it would be a lot quicker and easier just to hand-paint directly - and an artist acrylic varnish painted over an artist acrylic/oil paint will get a good bond. And I know it flexes well and doesn't crack and doesn't yellow with age.
Hope that helps.
 
Last edited:

Stand By

One Too Many
Messages
1,741
Location
Canada
Nice work and tutorial! Glad I stumbled on to this. Looks like fun.

Your insistence on taking care of your brushes is accurate. I still have and use (quite a bit) at least two Delta Red Sable's from when I was in high school (early '70's). Do not put a brush in a jar or glass—it'll golf-club on you in nothing flat and it won't go back go being straight—ever.

How did you decide to use oils and/or acrylics? Is that what was used on jackets in WWII? Just wondering as my first thought would have been One-Shot (or similar) sign paint.

Hi again, Foamy …

I just looked up the One Shot paints you mentioned and I see that they're all alkyd enamels … that'd be old school (well, if they used the old lead-based formula, that'd be true - these are now lead-free, I see) and how some original jacket art was done. That was fine - for back then ...
I'd say you could use them - but the range of colours isn't much to write home about, but if you're just planning on a simple name in a nice font, then you could use them as there appear to be some colours there that would work together (but many are quite bright and modern) … but how they'd perform on a flexing piece of leather, I really couldn't say. They could crack … I honestly don't know. The best and safest thing would be to have a test run on a piece of scrap leather and let it dry for the six weeks it states is required - then start bending it and see what happens …!
I read a reviewer state that the colours are somewhat inconsistent with regards to opacity, so "one shot" of painting may not cut it on the day with certain colours (the yellow was mentioned in particular) - you may need give it a couple of coats. Having sufficient working time with enamels could be a problem for some … and you don't want to feel rushed or pressured with these things.
Also, clean up is with turpentine of course - and with acrylics and oils, it's warm water and dish-washing detergent, so no ventilation required there either. Your girlfriend won't like the smell of enamel paint in the kitchen if you're painting at the kitchen table!
Personally, I'd look at acrylics or oils as I think that enamels are too limiting for this purpose.

P.S.
The only other range of paint that I can recommend - and that I know would work and are non-toxic - is the chalk paint by Annie Sloan. They behave just like acrylics and have been around for about 20 years and were developed for refinishing furniture. Yes, furniture. But they can be used on metal, tile, wood - and fabric/leather. I just did a course on using them and they are a snap to use and lay down really well and are very opaque. The colours are all very easy on the eye (lots of blue grey hints, you see) and complement each other beautifully and are not too bright - and I saw an old Kenneth Cole leather bag that had been completely painted (it used to be black - now a nice green-grey) and it looked great! I was amazed! And not a hint of cracking. And they bond to most anything - needing no special primer.
But they'd only be good for a simple project like a name - there are no flesh tones or anything like that.
 
Last edited:

navetsea

I'll Lock Up
Messages
6,818
Location
East Java
Thanks - I know, it was purely accidental and it looks authentic - and to try and replicate it again would probably make it look fake and contrived! :)

As for Krylon, it's a decent brand that makes good varnishes that I use here at work and on other art works - but I wouldn't recommend it for jacket art. It yellows with age for one thing. Also, I've only used it on hard objects such as acrylic moulds - and their fixative sprays on pencil drawings to seal them.
Would Krylon flex with the leather without cracking? That's the question.
Plus, because you'd be spraying it from a can, you'd need to do a good masking job around your art to protect the rest of the back panel - and that could be tricky with a name full of individual letters … it would be a lot quicker and easier just to hand-paint directly - and an artist acrylic varnish painted over an artist acrylic/oil paint will get a good bond. And I know it flexes well and doesn't crack and doesn't yellow with age.
Hope that helps.

good point, thanks. though I really prefer if somehow I can work digitally, then flip it horizontally to be printed on transfer decal, and seal it afterward. Waiting for a paint to dry is my WEAKNESS, many times I ruined things I painted or spray painted by handling it before the paint is completely dry.
 
Last edited:

Stand By

One Too Many
Messages
1,741
Location
Canada
good point, thanks. though I really prefer if somehow I can work digitally, then flip it horizontally to be printed on transfer decal, and seal it afterward. Waiting for a paint to dry is my WEAKNESS, many times I ruined things I painted or spray painted by handling it before the paint is completely dry.

Ah … can't help you there, my friend. I'm an analogue kind of guy, as you may be able to tell...! Digital media like that - I have NO clue about. I know that some modellers make their own decals for their kits and I see the decal paper in my local model shop for printing on - (so you may wish to do a search on that - or ask someone who makes the decals for kits for their input) - but that's the extent of it for me as it's all anathema to me. If I need decals, I just buy them in off the web having let someone else do all the hard work!
 

Big J

Call Me a Cab
Messages
2,961
Location
Japan
Stand By, I'm really glad that you posted these threads!
I can't thank you enough for taking the time and trouble to explain all of this, and I'm really looking forward to having a bash at it myself! Although, TBH, I'm kind of intimidated by it all really; this needs a level of skill I don't think I have.

Maybe I should buy a really cheap mall jacket from the bay to practice on?
 

Stand By

One Too Many
Messages
1,741
Location
Canada
Stand By, I'm really glad that you posted these threads!
I can't thank you enough for taking the time and trouble to explain all of this, and I'm really looking forward to having a bash at it myself! Although, TBH, I'm kind of intimidated by it all really; this needs a level of skill I don't think I have.

Maybe I should buy a really cheap mall jacket from the bay to practice on?

Thanks for saying so, Big J. I really appreciate you taking the time to let me know that you like the show so far - as yes, it's been some work to put this together with a text that people can follow and will make sense as they go, plus decent photos, but I hope it helps someone somewhere … and coming up next will be the step-by-step photos of actually how to do the painting, so I've tried to make it as clear as possible - and hopefully inspiring, so people may feel ready enough to have a go themselves if they wish to try …
I wouldn't say you need a jacket to try painting on - as I say in my text, a mounted stretched canvas in a simple wooden frame from an art store is very cheap - and there's your instant back panel! And it will have a grain like goatskin too. Being off-white already, just paint it with a coat of brown acrylic paint to match the jacket you have (say a nice russet colour) and you're good to go! And if the attempt falls flat, there's no harm, no foul to any jacket …!

I'll get the next instalments out ASAP. I'm busy here at work, so will release the next parts as time allows …
Thanks again!
 

Big J

Call Me a Cab
Messages
2,961
Location
Japan
Thanks for saying so, Big J. I really appreciate you taking the time to let me know that you like the show so far - as yes, it's been some work to put this together with a text that people can follow and will make sense as they go, plus decent photos, but I hope it helps someone somewhere … and coming up next will be the step-by-step photos of actually how to do the painting, so I've tried to make it as clear as possible - and hopefully inspiring, so people may feel ready enough to have a go themselves if they wish to try …
I wouldn't say you need a jacket to try painting on - as I say in my text, a mounted stretched canvas in a simple wooden frame from an art store is very cheap - and there's your instant back panel! And it will have a grain like goatskin too. Being off-white already, just paint it with a coat of brown acrylic paint to match the jacket you have (say a nice russet colour) and you're good to go! And if the attempt falls flat, there's no harm, no foul to any jacket …!

I'll get the next instalments out ASAP. I'm busy here at work, so will release the next parts as time allows …
Thanks again!

When you think about it, you've got a pretty specialized skill. How many people really have that much knowledge, and practical experience? Not many, I reckon. And then you've got talent on top of that. That's pretty awesome.
 
Messages
16,775
Stand By, I'm really glad that you posted these threads!
I can't thank you enough for taking the time and trouble to explain all of this, and I'm really looking forward to having a bash at it myself! Although, TBH, I'm kind of intimidated by it all really; this needs a level of skill I don't think I have.

Maybe I should buy a really cheap mall jacket from the bay to practice on?

+1 on everything Fifi said.

I think I've enough knowledge at this point to try something out on my CR.
 

Stand By

One Too Many
Messages
1,741
Location
Canada
When you think about it, you've got a pretty specialized skill. How many people really have that much knowledge, and practical experience? Not many, I reckon. And then you've got talent on top of that. That's pretty awesome.

I don't quite know what to say. Big J … except thank you! :)

And Monitor, I'm glad you're feeling able to have a run at something already! Remember to just keep it simple for now - like a name or a simple design like a cartoon character without much detail (I'm thinking Tweety Pie or Bugs) or a simple BS/BG patch - nothing too daunting that may put you off later … and my thanks as well.
I'm hoping to get more up this week … please stand by! ;)
 

Stand By

One Too Many
Messages
1,741
Location
Canada
I was thinking about the original Teaser Trailer thread that I created prior to the launch of the 101 threads (which TFL would compile into an Omnibus), and was thinking that there were some nice points made in there, so for anyone interested, it is here:

http://www.thefedoralounge.com/forums/threads/teaser-trailer-for-an-upcoming-thread.82141/

IMO, the best point made was by Big J who asked a very good question, namely if he could use military model paint on a jacket and he made mention of Tamiya paint ( a most reputable brand synonymous with quality) – as that would give the painter an instant colour of the correct military shade to use - and I gave a brief answer and I was thinking that it deserved expanding upon for anyone interested in doing some painting, so if I may, I’d like to do that here.

Paints for scale model kits fall into two categories; either enamels or acrylics.

Enamel paints
are oil-based and are rich in colour and dry quickly – perhaps too quickly for the subject you are attempting. They reach a shell-hardness after a week or so and may flake when the leather flexes. For those reasons, I would not recommend them for this application.

Acrylic paints are usually water-based and are safe to use on a jacket – as are the artist acrylics in art shops.
However, it would be a mistake to assume that all acrylic paints from model/hobby shops are just as safe as most require a thinner other than water.
According to an article by Aaron Skinner in Fine Scale Modeler (November 2014), Tamiya acrylic paints are alcohol-based and need to be thinned with Tamiya acrylic thinner or alcohol. Personally, I wouldn’t want to put anything alcohol-based on my jacket.
Italeri, Testors, Vallejo and Xtracrylix all need their own thinner – again, a chemical.
CSI Creos (Gunze Sangyo) requires Tamiya thinner or alcohol – or water, so that would suggest to me that it would be safer.
But IMO the best option would be Humbrol – as it is the only model paint manufacturer that requires water as a thinner.

In my original reply to Big J, I said that one possible benefit of using the Humbrol series would be to use the metallic colours if they were required.
But then it got me thinking, if I was tasked with painting a B-29 for example, I was wondering if I would use them?
It then made me wonder how an all-metal finish would be created for, say, a B-29 would be achieved and knowing that, back in the day, an artist on a base would likely as not have access to a nice metallic paint. Judging from what I see of jacket art in my reference books, it seems to me that the effect was achieved using white and very light greys.
But if you wanted to use a metallic wash, you could. Or you could use mostly white – with a hint of light grey and a hint of silver.
And that made me realize that I should make mention of the fact that a varnish coat (which I cover in the 101 series and recommend) should be applied very sparingly – or not at all – on metallic paint.

How do I know this?

Well, many years ago, I got a (not inexpensive) garage kit of a Blade Runner prop/pistol – a “Pflager Katsumata - series D” to be correct (the initials PKD being Philip K. Dick – the author of the book on which Blade Runner is based, “Do Androids Dream of Electric Sheep?”).
It was a horrible kit. A dreadful casting from the “other” pistol (4 props were used – 2 heroes and 2 “others”) – the “hero” was used for the close-up shots – the inferior non-hero prop was the one for long-shots and would be the one that was tossed to the ground at the end by Gaff.
Anyway, wanting something better than what the kit could give me, I duplicated every part and section individually and recast it myself in acrylic resin, squaring all the edges, then hollowing and and filling each with lead from the Radiation Dept. to give the gun some weight and heft. I used a brass deck bolt for the receiver, hand carved and cast my own switches in non-precious dental alloy, carved the grips from cherry wood (the original hero prop had amber grips – but I didn’t have access to that, so I went with cherry, carved and sanded it , stained and varnished), put in my own Lithium battery, on/off switch and wiring for the LEDs with an access panel and gave it a nice metallic gun metal finish using Humbrol paints. It looked grand.
And then finally, like every other kit, I gave it a final coat of satin varnish to protect it. I thought it would be fine. I really did.
BIG MISTAKE.
It killed the metallic finish completely! It reduced it to a completely flat grey – not even a hint of any metallic or blue at all! I was suddenly left with just a boring and lifeless old grey. Clearly the varnish affected the path of the angle of light (and the way light bounces off objects is how we all see colour) as it passed through the varnish and changed my perception of colour along with it.
So painfully, I had to re-sand and re-prime the whole thing and re-paint it – again using Humbrol metallic gun metal, silver, matt black and an Engineer’s Blue-type colour again to emulate a Parkerized finish.
Then I gave it a super-light mist of gloss varnish only – hardly anything at all – and it still reduced the metallic blue sheen I was after, but to what I considered an acceptable degree. I sure as heck wasn't about to strip it again and re-do it for a third time over that.

A photo for illustration :

PK-D#5.JPG


So do be very careful with any matt or satin varnish if you use a metallic paint for an exhaust area or bare metal finish! Less is definitely more in that instance.
Or not at all works too.
 
Last edited:

CBI

One Too Many
Messages
1,419
Location
USA
OK, I will chime in just to "help". As a few of you know from the VLJ site and maybe a few here, I have painted LOADS of jackets and patches. The points and time spent above are great! However the majority of paints use in WW2 on jackets were lead based paints (which are no longer available for sale in the US). In order to get that 100% authentic look, one's paint choice needs to be as close to lead and the pile qualities of it as one can. Its the depth and pile of lead paints that is hard to duplicate. For this reason IMO, acrylic paints (which are a post WW2 invention) just don't look authentic - about 95% of the time. They look super but most always "off" With enamel paints get one closer to WW2 and "old school" ..........isn't that what one wants? To look 1940's? Enamel can be pretty stable with sealers added on top. Do they crack a little????.............YES, but that's the look. A few cracks add to the authenticity. I have heard of some jacket painters who have used enamel with poor results but I don't think the leather was either properly prepped or sealed. Since many jackets in the 40's were painted with oils and leather dyes, those can look convincing. "One Shot" vintage sign paint was mentioned. Its GREAT, a total vintage look, yes limited colors and expensive, slow drying and quite toxic! Its easy to mix with other One Shots for many color variations. For those who remember Jerome Urbaniak, one of the kings in the jacket painting world, he and I went back and forth via emails about the pros/cons of enamel which he did not use for some of the reasons listed. I have never had any issues with enamels and One Shot at least in the last 10 years I have been using them. if you search some older threads of mine, you can see artwork samples. Not trying to stir anything up, just food for thought and I must admit, tired of too many back and forth on this topic. Oh, also consider the 40's era color palette, different than today, more brown-ish. Try to find a 40's era color sampler, maybe its the age but slightly more browns based overall.

Yes, a few acrylic guys can pull off the look but its tough for the true 40's feel........IMO

Not saying I do either but I wish I could buy lead based paints. I think they sell them in Mexico but not making that trip!
 
Last edited:
Messages
234
Location
Northern California
Although a little harder to find, lead white is still available in artist oils. Also, it can be found at estate sales etc. if you look around. I've got a 5 gallon bucket full of the stuff over the past 20 years or so most recently picking up a batch last summer. A squeeze of the tube will let you know if it's still good, even if it gives just a little it can be reconstituted. The formula has changed little over the years up to this day and most of the pigment has been the same since the beginning of time.

Harry Holl of the 401st Bomb Squadron in the 8th Air Force England replied "oils, what else?" when I asked what he used for painting all of those little B&W's you see of A2 Jacket backs with pinups. Diabolical Angel, Der Grossarschvogel, Grin'n Bare It, to name just a few. Said he picked up a set in London while on some R&R. The photos of his work can be found in many places, countless books and online. I had no reason to question whether or not it was truly his work after seeing about 30 small period photos of them scattered around a few other items in a Cape Cod Gallery featuring some of his paintings and pottery. Got to meet him just a couple of years before he passed somewhere in between 2000 and 2010.
 

Forum statistics

Threads
108,940
Messages
3,071,124
Members
54,003
Latest member
brendastoner
Top