So here we are at our last stop before we get busy and take an indelible step forward ...
Up to now, it's all been quite exciting and fanciful wishful thinking - but harmless. And we're about to cross that threshold, so I thought I'd add just a few final words on painting before we do that, so that you, gentle reader, may feel as prepared as possible.
As I said, here's Playin' Jane as seen on my ELC C-3.
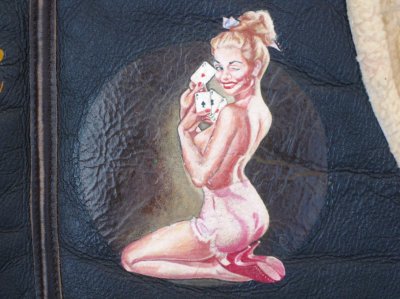
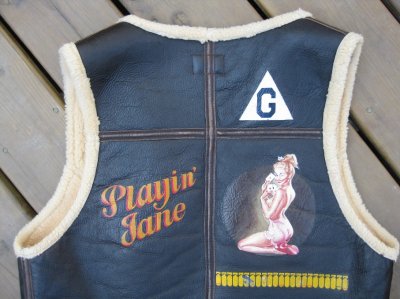
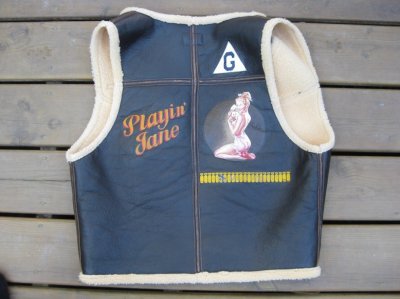
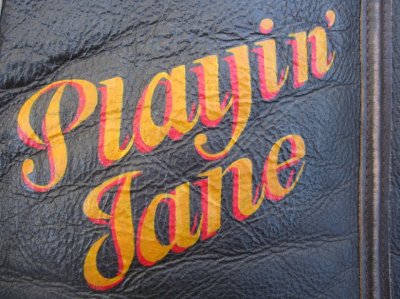
Again, the flesh tones were done in oils.
Get good quality artist brushes - from an art shop, not a hobby store. There's a big difference in quality and a poor brush will hamper your ability to pull this off. And if you invest in good quality brushes and paints, with dutiful care, they can last for future projects.
Your canvas is the rear panel of your jacket and, like any canvas, it needs to be held flat and taught - so get a piece of hardboard or ply-wood of an appropriate size on which you can put your jacket on and then zip it up on the other side to make it snug so it won't move. The one I use is 18” x 24”.
Then you are going to tape your stencil to the back panel, making sure it is placed precisely where you want it and at the correct rotation - and then very gently and lightly rub the precise area to be painted with some fine sandpaper just to prep the surface and give it a little "tooth" - and brush away any debris. Alternatively, clean the area to be worked on with just a little alcohol - just a wee bit! One pass is all I'm talking about. Do not use acetone - it's far too harsh and will remove the colour of the tanning as well as everything else! So very carefully does it and you are ready to go.
And then comes the very hardest part: putting that first touch of the brush and the paint to the jacket!
Up to that point, it's all just been quite exciting dreaming and planning and design and prep work - and you could always change your mind about it all with no harm done.
But committing that first paint stroke ... I do say it requires a certain leap of faith and - and yes, you could be about to ruin your jacket.
But you won't know if you don't try!
But what's the worst that can happen?
If it all looks wrong, just keep painting over and correcting what you've done until it looks right. Don't give up at the first fallen fence. Have another run at it.
A long time ago and after making models for many years (since I was 6) and developing my skills, I once made a Tamiya 1/350 Bismarck battleship and made a truly terrible job of the splinter camouflage. It totally surprised me - I thought it was a challenge that was well within my abilities. It looked really awful to me - and I really thought my modelling mojo had suddenly upped and gone. Seriously, I did. I was gutted. But the kit was expensive to me and so I took a deep breath and a good step back. I stripped all of the paint back to the bare plastic, carefully sanded everything smooth and re-primed and had a fresh crack at it - and I astonished myself as it turned out beautifully! I couldn't believe that the second run was as good as the first one was terrible. Such is the power of patience and perseverance! Had I not tried again, I would have given up there and then and have decided that that was my limit of ability - which it certainly was not!
But that said, if it looks disappointingly bad in the end and the job appears to be more than you're capable of, you can always pass the job on to an artist to paint over ... but you may just astonish yourself, as I did with Stand By!
"Baby steps" suggestion: You could always start by testing your painting abilities with just attempting a name in a nice 1940s/1950s/military font with a couple of the colours you like - keeping it simple - and you could always have a test-run on a piece of stretched canvas in a wood frame from an art store. They are cheap and canvas has a nice grain somewhat similar to goatskin. Just paint on a white base and add a few coats of brown in a matching tone to your jacket and it will look like your jacket's back panel - and paint on that as a safe dry-run. And if it turns out well, you'll have a nice piece of wall art! (and one that could go in a bathroom like my Stand By. No amount of steam from the shower can make it warp!). But bear in mind that your commitment level will be less with a stretched canvas - if you think things aren't going well, you might decide to quit earlier as there's less incentive to keep going and try harder ... But it could be a case of better safe than sorry. Only you can know.
Note that painting on horsehide gives you a superbly smooth canvas to paint and work on.
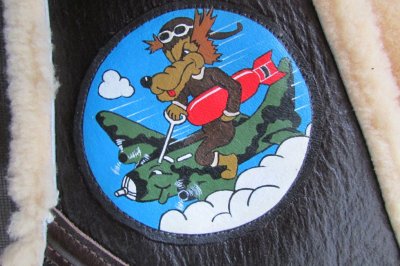
Steerhide is almost as fine and is just as good for this. The patch below of the 729th BS was made on a piece of my old Aviation Leathercraft A2 and is on my girlfriend's ELC C-3. As you can see, it's a good way to get a neat patch on to an otherwise rough hide like sheepskin.
Goatskin is naturally pebbly by nature and is slightly more challenging and makes fine work look a hint less straight in fine detail, but as original goatskin A2s were painted, so can yours be. It shouldn't stop you by any means.
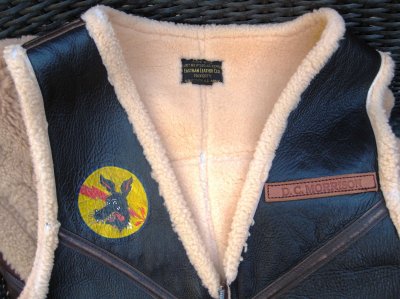
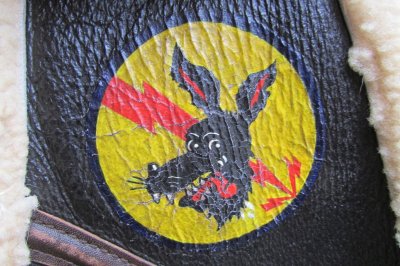
Sheepskin, however, has a lot more texture and offers extra challenges to get straight lines looking straight - and I can't recommend it. The 364th BS patch below has worn appreciably due to the texture of the hide.
So, that's the theory all done.
Now to the practical part - and painting on the jacket!
End of Part 4.
Up to now, it's all been quite exciting and fanciful wishful thinking - but harmless. And we're about to cross that threshold, so I thought I'd add just a few final words on painting before we do that, so that you, gentle reader, may feel as prepared as possible.
As I said, here's Playin' Jane as seen on my ELC C-3.


Again, the flesh tones were done in oils.
Get good quality artist brushes - from an art shop, not a hobby store. There's a big difference in quality and a poor brush will hamper your ability to pull this off. And if you invest in good quality brushes and paints, with dutiful care, they can last for future projects.
Your canvas is the rear panel of your jacket and, like any canvas, it needs to be held flat and taught - so get a piece of hardboard or ply-wood of an appropriate size on which you can put your jacket on and then zip it up on the other side to make it snug so it won't move. The one I use is 18” x 24”.
Then you are going to tape your stencil to the back panel, making sure it is placed precisely where you want it and at the correct rotation - and then very gently and lightly rub the precise area to be painted with some fine sandpaper just to prep the surface and give it a little "tooth" - and brush away any debris. Alternatively, clean the area to be worked on with just a little alcohol - just a wee bit! One pass is all I'm talking about. Do not use acetone - it's far too harsh and will remove the colour of the tanning as well as everything else! So very carefully does it and you are ready to go.
And then comes the very hardest part: putting that first touch of the brush and the paint to the jacket!
Up to that point, it's all just been quite exciting dreaming and planning and design and prep work - and you could always change your mind about it all with no harm done.
But committing that first paint stroke ... I do say it requires a certain leap of faith and - and yes, you could be about to ruin your jacket.
But you won't know if you don't try!
But what's the worst that can happen?
If it all looks wrong, just keep painting over and correcting what you've done until it looks right. Don't give up at the first fallen fence. Have another run at it.
A long time ago and after making models for many years (since I was 6) and developing my skills, I once made a Tamiya 1/350 Bismarck battleship and made a truly terrible job of the splinter camouflage. It totally surprised me - I thought it was a challenge that was well within my abilities. It looked really awful to me - and I really thought my modelling mojo had suddenly upped and gone. Seriously, I did. I was gutted. But the kit was expensive to me and so I took a deep breath and a good step back. I stripped all of the paint back to the bare plastic, carefully sanded everything smooth and re-primed and had a fresh crack at it - and I astonished myself as it turned out beautifully! I couldn't believe that the second run was as good as the first one was terrible. Such is the power of patience and perseverance! Had I not tried again, I would have given up there and then and have decided that that was my limit of ability - which it certainly was not!
But that said, if it looks disappointingly bad in the end and the job appears to be more than you're capable of, you can always pass the job on to an artist to paint over ... but you may just astonish yourself, as I did with Stand By!
"Baby steps" suggestion: You could always start by testing your painting abilities with just attempting a name in a nice 1940s/1950s/military font with a couple of the colours you like - keeping it simple - and you could always have a test-run on a piece of stretched canvas in a wood frame from an art store. They are cheap and canvas has a nice grain somewhat similar to goatskin. Just paint on a white base and add a few coats of brown in a matching tone to your jacket and it will look like your jacket's back panel - and paint on that as a safe dry-run. And if it turns out well, you'll have a nice piece of wall art! (and one that could go in a bathroom like my Stand By. No amount of steam from the shower can make it warp!). But bear in mind that your commitment level will be less with a stretched canvas - if you think things aren't going well, you might decide to quit earlier as there's less incentive to keep going and try harder ... But it could be a case of better safe than sorry. Only you can know.
Note that painting on horsehide gives you a superbly smooth canvas to paint and work on.
Steerhide is almost as fine and is just as good for this. The patch below of the 729th BS was made on a piece of my old Aviation Leathercraft A2 and is on my girlfriend's ELC C-3. As you can see, it's a good way to get a neat patch on to an otherwise rough hide like sheepskin.

Goatskin is naturally pebbly by nature and is slightly more challenging and makes fine work look a hint less straight in fine detail, but as original goatskin A2s were painted, so can yours be. It shouldn't stop you by any means.
Sheepskin, however, has a lot more texture and offers extra challenges to get straight lines looking straight - and I can't recommend it. The 364th BS patch below has worn appreciably due to the texture of the hide.


So, that's the theory all done.
Now to the practical part - and painting on the jacket!
End of Part 4.
Last edited:
