Want to buy or sell something? Check the classifieds
  • The Fedora Lounge is supported in part by commission earning affiliate links sitewide. Please support us by using them. You may learn more here.

The DIY Vintage Repair Before/After Thread

martinsantos

Practically Family
Messages
595
Location
São Paulo, Brazil
I would sand it first, taking off all the varnish. (there are some products, using caustic soda, that make this easier, if the varnish is very hard to take off with sand. Anyway, after you will need to sand a little).

If you know how to revarnish again, go ahead. If not, I would say to consider about waxing the wood. A very common fininshing at those days. In my own experience, at least here, much more than varnish.


I'm so impressed with the work that everyone has done here - well done!

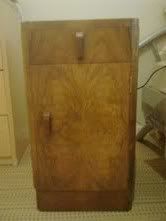
I was hoping some of you could give me some tips for some DIY - I have two 1930's bedside lockers that are in need of some TLC - they came with a dresser that is in perfect condition (the lockers clearly got a lot more use) and when they are all reunited again (the dresser is in my brother's house as we have no room for it at the moment) I would like them all to look their best and like they match!

The tops of the lockers show a lot of wear but the sides are in lovely condition - smooth and laquered I think. What do I need to do - sand them? Varnish them? Clear varnish or coloured varnish?! As you can see I am a complete novice when it comes to this kind of thing but it's something I would love to do. Any help would be of great assistance.

Here is one of the lockers:

Locker.jpg


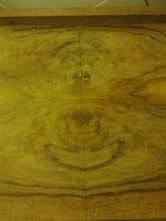
And here is the top that seems to have a lot of water damage:

Top.jpg


Thank you!
 

Miss Golightly

Call Me a Cab
Messages
2,312
Location
Dublin, Ireland
I would sand it first, taking off all the varnish. (there are some products, using caustic soda, that make this easier, if the varnish is very hard to take off with sand. Anyway, after you will need to sand a little).

If you know how to revarnish again, go ahead. If not, I would say to consider about waxing the wood. A very common fininshing at those days. In my own experience, at least here, much more than varnish.

Thank you for that!

The idea of varnishing fills me with dread I have to say - I think I would be so afraid of making a mess of it - sanding I think I would be fine with - and the waxing. The sides of the lockers have a high shine to them - kind of like a mirror - I wonder if someone varnished them only a few years ago - so hard to say.

I really don't have a breeze about these things - I'll have a think about what to do next - maybe for the sake of not making a complete hames of them I might give them to a professional to deal with - I would hate to do something to them and then regret it....
 

martinsantos

Practically Family
Messages
595
Location
São Paulo, Brazil
First time sanding this type of piece?

Get at least three grades of sandpaper. The hardest will do most of the job, taking off most of the varnish.

The softest type is sandpaper for gold - so soft that you won't feel in your fingers the sand. This will give to the wood a soft touching!

Waxing. I think that usually the wood is very very dry after so many years. So be generous with wax. Don't polish imediatly, give an hour to the wood. Repeat the cycle. Good chances that you will need to wax again in two or three weeks. But then will be easier and quicker to do this.

Good luck - and don't forget to show the results!


Thank you for that!

The idea of varnishing fills me with dread I have to say - I think I would be so afraid of making a mess of it - sanding I think I would be fine with - and the waxing. The sides of the lockers have a high shine to them - kind of like a mirror - I wonder if someone varnished them only a few years ago - so hard to say.

I really don't have a breeze about these things - I'll have a think about what to do next - maybe for the sake of not making a complete hames of them I might give them to a professional to deal with - I would hate to do something to them and then regret it....
 

Miss Golightly

Call Me a Cab
Messages
2,312
Location
Dublin, Ireland
First time sanding this type of piece?

Get at least three grades of sandpaper. The hardest will do most of the job, taking off most of the varnish.

The softest type is sandpaper for gold - so soft that you won't feel in your fingers the sand. This will give to the wood a soft touching!

Waxing. I think that usually the wood is very very dry after so many years. So be generous with wax. Don't polish imediatly, give an hour to the wood. Repeat the cycle. Good chances that you will need to wax again in two or three weeks. But then will be easier and quicker to do this.

Good luck - and don't forget to show the results!

First time sanding ANYTHING - hence the fear!!!!!!! That's fantastic advice - I would love to give it a go myself - I would be so proud if it worked out! And if so this thread will be inundated with photos of my craftmanship - from all possible angles!

Just one more question - does waxing give the wood a polished appearance? Almost like a high gloss finish?
 

martinsantos

Practically Family
Messages
595
Location
São Paulo, Brazil
Well, when you go buying the sandpaper say clearly that is WOOD sandpaper. There are some types harder.

Wax can give a polished appareance (in this the softest sandpaper will help a lot). And will be glosser everytime you polish again with wax. But you won't get a high gloss as a well aplied varnish.

From my experience here (can be quite a lot different than you can see in Ireland and another countries!) varnish was applied usually in two ways in fine forniture. In high ammount, with machines, and then put to dry with low heat. Another, for finer forniture, is what we call here as "Verniz de boneca" (dolly varnish, in literal translation). A kind of solid varnish, well diluted in aguarraz (I don't know the english term to this - it's a solvent) put in cotton. The cotton into a piece of fabric. You will "paint" the forniture with this (looks like a doll's head, so the name). You make the first "paiting". Wait to dry. Then paint again. Everytime you do another paiting, the gloss will be highter. But this is VERY difficult at first time!

The radio I put in this thread was varnished this way - three times.
 

Miss Golightly

Call Me a Cab
Messages
2,312
Location
Dublin, Ireland
Well, when you go buying the sandpaper say clearly that is WOOD sandpaper. There are some types harder.

Wax can give a polished appareance (in this the softest sandpaper will help a lot). And will be glosser everytime you polish again with wax. But you won't get a high gloss as a well aplied varnish.

From my experience here (can be quite a lot different than you can see in Ireland and another countries!) varnish was applied usually in two ways in fine forniture. In high ammount, with machines, and then put to dry with low heat. Another, for finer forniture, is what we call here as "Verniz de boneca" (dolly varnish, in literal translation). A kind of solid varnish, well diluted in aguarraz (I don't know the english term to this - it's a solvent) put in cotton. The cotton into a piece of fabric. You will "paint" the forniture with this (looks like a doll's head, so the name). You make the first "paiting". Wait to dry. Then paint again. Everytime you do another paiting, the gloss will be highter. But this is VERY difficult at first time!

The radio I put in this thread was varnished this way - three times.

Ah ok I see - I think the waxing sounds like the safest solution for me to try - the lockers need to be sanded for sure - the varnish (I suppose it's varnish) has peeled off the tops of both - the one I use being in worse shape. This could be my next project! Thank you for your tips and advice - much appreciated!

Well done on the work you put into your radio - it shows - a brilliant restoration!
 
Messages
10,883
Location
Portage, Wis.
Show Us Your Projects, Refurbs, and Restorations!

Here is my project from tonite. I bought this fan at Goodwill a couple years ago and my pop is always borrowing it from me. Last time, he had it down at the shop for a couple weeks and when I went to plug it in, nothing. He failed to tell me it died on him a couple weeks ago.

Well, I jumped the wires, turned out the switch was bad, but while I was in there, I took everything apart, gave it a good cleaning and put it all back together. Running like new now. I was rather surprised Ace Hardware had a switch that fit the application. Excuse the poor photos, had to take them with my cell phone, camera's on the blink.

Here's a pic from when I got the fan a couple years ago.
picsfrommyphone019.jpg

And tonite.
2011-03-0695030941.jpg

2011-03-0695044629.jpg

2011-03-0695044641.jpg
 
Last edited:

PoohBang

Suspended
Messages
781
Location
backside of many
well if you remember I bought that old Crimes-Stassforth Wooden File Cabinet and it was missing 3 of it's handles. I've searched high and low to find a copy and found none anywhere. Nothing on a 5" center and with the fancy ends, so I made my own. I casted the one handle I had in silicone and poured 3 cast resins of the handle. I base coated a black flat and topped it with a bronze. That way if it get a few scratches it should mimic the original brass pretty well.

DSC07281.jpg


They're not perfect and I do have to use them gingerly since they are just plastic, but for now they at least finish it and match for the most part.
DSC00745.jpg

back side, you can see the white resin.
DSC00747.jpg

The finished product... new screws that hopefully will tarnish over time.
DSC00746.jpg

the original on the bottom, but with the flash looks more off in color than in natural light.
 

Mr_D.

A-List Customer
Messages
320
Location
North Ga.
Restoring my old wardrobe

Forgive me for just posting a link to this restoration. I figure it's easier for me to only have to update one thread on one board then several.

I picked up this old wardrobe at the Salvation Army store last week.

dresser2.png


After looking at it in my bedroom for a few days, I decided to start the restoration.

I knew I have to remove the old veneer, but I wasn't sure if I wanted to replace it or just sand down the wood under it and stain it. I decided on the later.

MORE HERE
 

MikeBravo

One Too Many
Messages
1,301
Location
Melbourne, Australia
Well, when you go buying the sandpaper say clearly that is WOOD sandpaper. There are some types harder.

Wax can give a polished appareance (in this the softest sandpaper will help a lot). And will be glosser everytime you polish again with wax. But you won't get a high gloss as a well aplied varnish.

From my experience here (can be quite a lot different than you can see in Ireland and another countries!) varnish was applied usually in two ways in fine forniture. In high ammount, with machines, and then put to dry with low heat. Another, for finer forniture, is what we call here as "Verniz de boneca" (dolly varnish, in literal translation). A kind of solid varnish, well diluted in aguarraz (I don't know the english term to this - it's a solvent) put in cotton. The cotton into a piece of fabric. You will "paint" the forniture with this (looks like a doll's head, so the name). You make the first "paiting". Wait to dry. Then paint again. Everytime you do another paiting, the gloss will be highter. But this is VERY difficult at first time!

The radio I put in this thread was varnished this way - three times.

This sounds like what we call "French polishing". The varnish or shellac comes in flake form and is dissolved with a solvent, then rubbed on in several layers. Have a look at Wikipedia
 

Giftmacher

One Too Many
Messages
1,405
Location
Hohenmauth CZ
This a Czechoslovak 4-tube radio set from late 40's. There was not much work on it, just cleaning and capacitors changing. Glass scale which was broken during shipment taken from another piece. Brocade is quite unavailable these days, so I used fabric similar to original. Radio is fully operational.
 
Last edited:

Forum statistics

Threads
107,283
Messages
3,032,958
Members
52,748
Latest member
R_P_Meldner
Top