Want to buy or sell something? Check the classifieds
  • The Fedora Lounge is supported in part by commission earning affiliate links sitewide. Please support us by using them. You may learn more here.

Gentlemen, show us what you've made!

Johnny J

Call Me a Cab
Messages
2,109
Location
Panama City, Florida
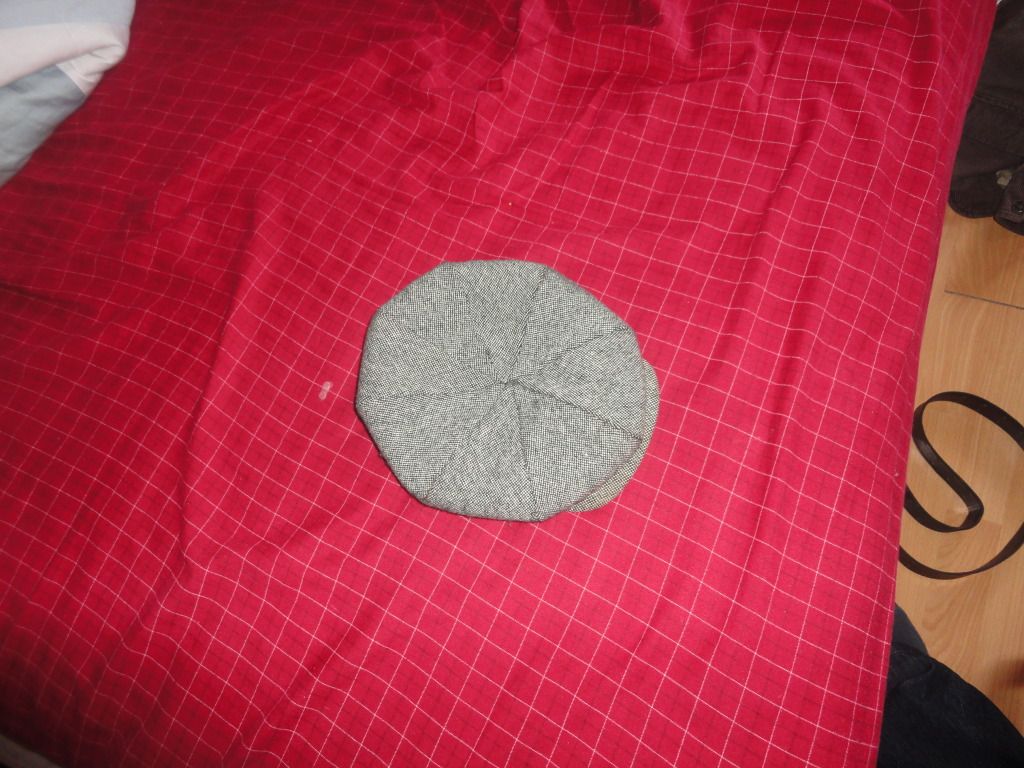
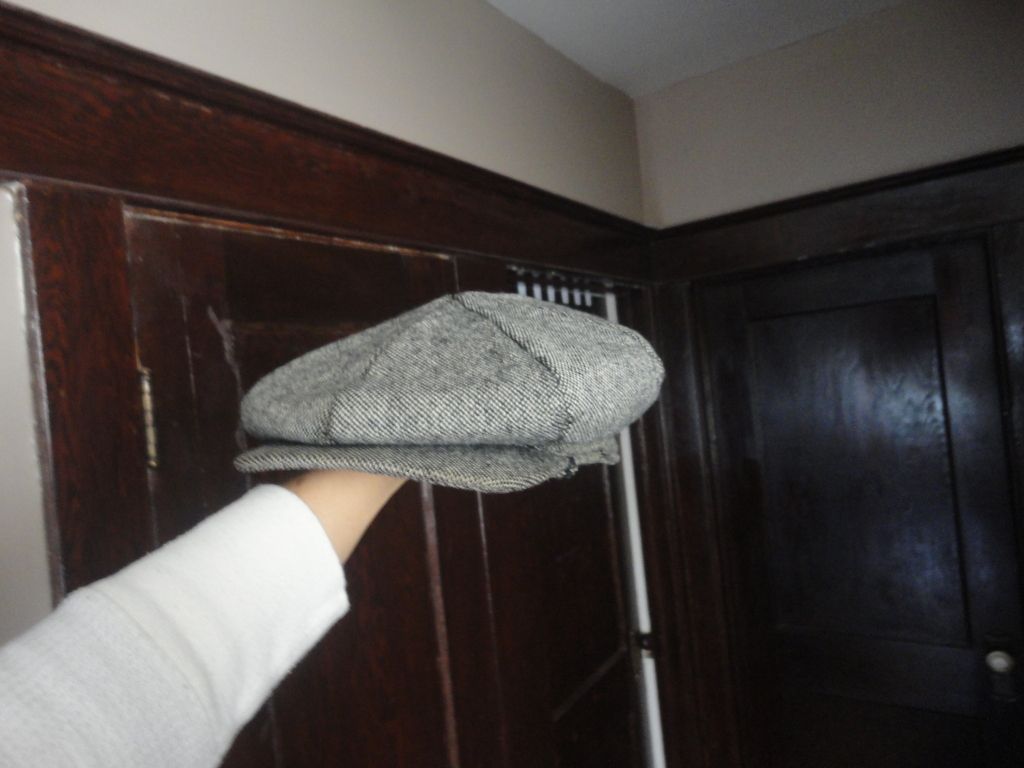
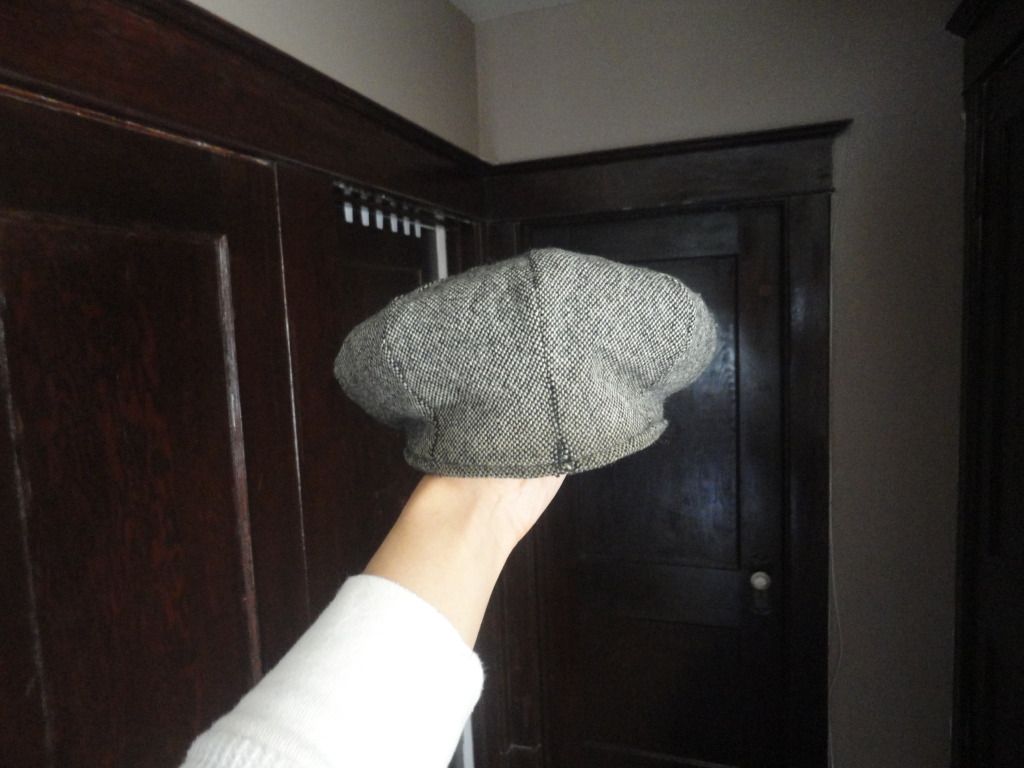
I think flat-caps are pretty snazzy things. Are they difficult to make? I've been thinking of making one for myself, once I find some suitable material. I'm gradually getting the hang of using my gran's Singer and I'd like to start doing some simple projects on it.

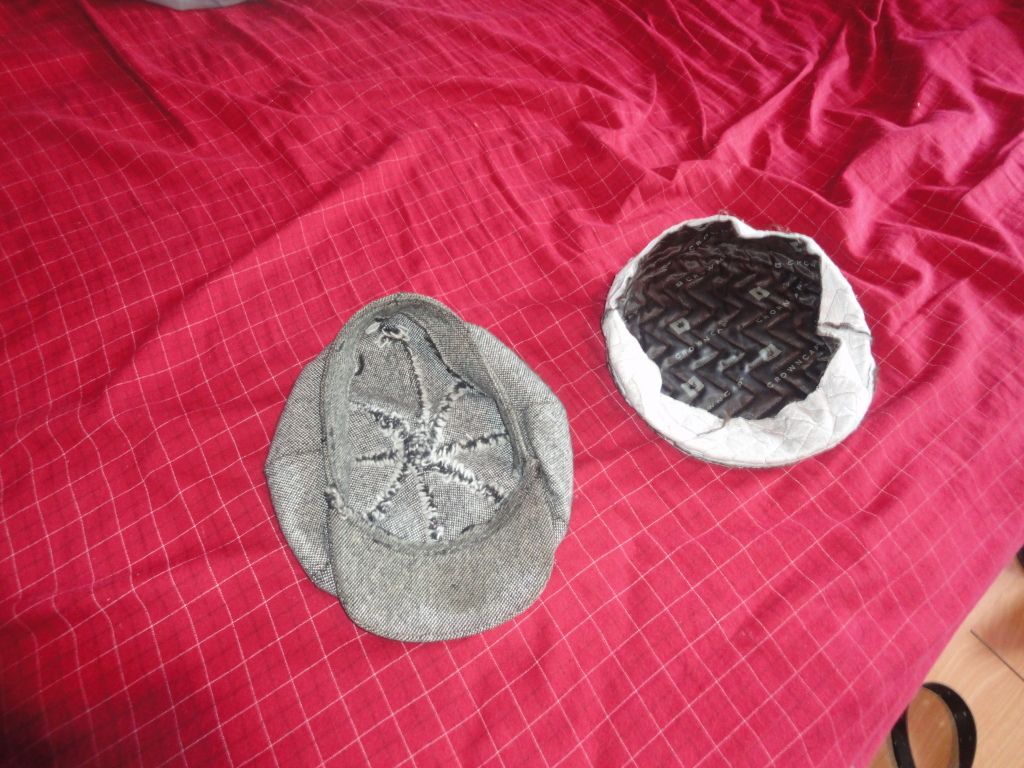
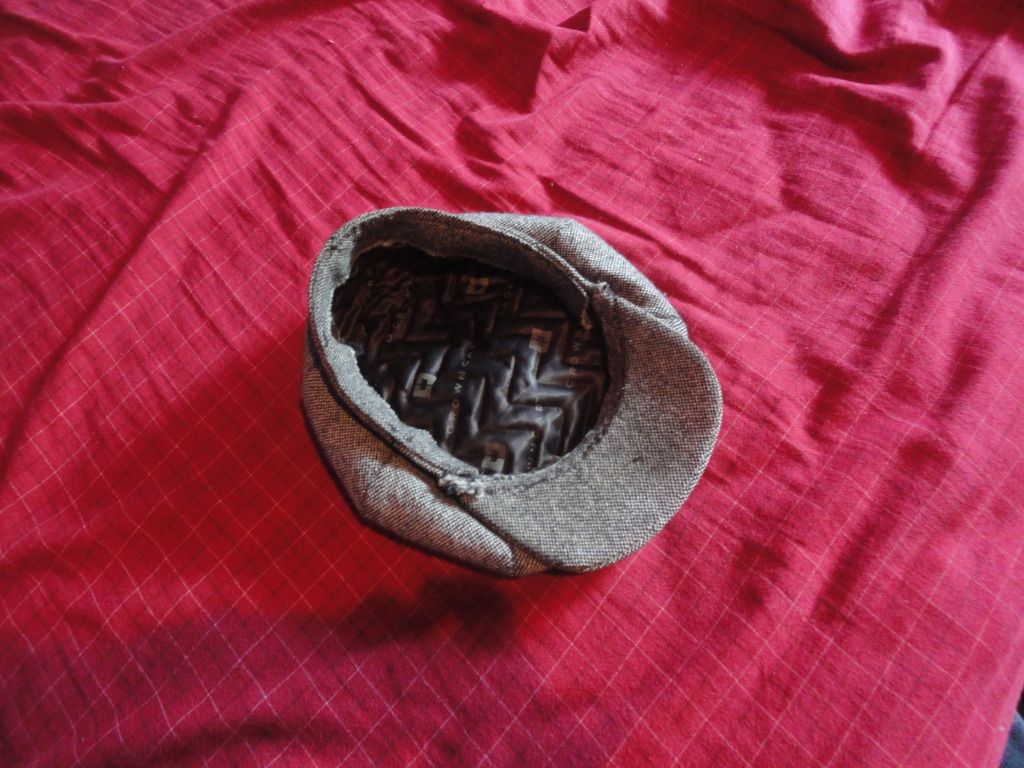
Simple? No. Especially getting the right size. I took one apart and made a pattern from it.
 

Johnny J

Call Me a Cab
Messages
2,109
Location
Panama City, Florida
DSC04573.jpg

DSC04575.jpg

More pics in Cap Faction.
 

willyk57

New in Town
Messages
18
Location
Harrisburg, PA
Johnny J

The cap looks really good. It sits well and the brim looks a little longer than a off the rack model. I love the look.

What did you use for the brim stiffener and the cap liner?

Best,
Willyk57
 

Pinesiw

A-List Customer
Messages
308
Location
Thompson
This is the result of 5 attempts at the newsboy cap. Like I said in cap faction no liner, I put one in from a different cap, and I think it looks great from the outside but the inside looks hideous.
DSC01485.jpg

DSC01486.jpg

DSC01489.jpg

DSC01517.jpg

DSC01519.jpg

DSC01501.jpg

DSC01507.jpg
 

Shangas

I'll Lock Up
Messages
6,116
Location
Melbourne, Australia
That's very smart, Pinesiw! Very sharp.

I made this:

IMG_1280.jpg

IMG_1282.jpg

IMG_1283.jpg


Some of you may remember I made another one previously, a cosey for my vintage copper bed-warmer. The other one was neat, but it was very rough, handmade, and the fabric was so thin that if you held the bottle for any longer than about 10 seconds, you'd burn your hands.

I made this one out of leftover fabric. I used my grandmother's Singer to do all the stitching. It's thicker and is much better-suited to what I had in mind. I used the buttonhole-attachment on the machine to make the holes through which I passed the cord for tying up the top of the bag.

I know it's not very neat, but it's designed to be practical, not pretty! Here's the hot-water bottle inside:

IMG_0826.jpg
 
Last edited:

Shangas

I'll Lock Up
Messages
6,116
Location
Melbourne, Australia
Behold my first serious attempt to make for myself, something which I can actually *wear*. This is made out of some fabric which I bought at the local thrift-shop...

IMG_1304.jpg


If you haven't figured out what it is yet, it's supposed to be a dressing-gown. It's winter here in Melbourne, and sometimes, regular PJs just don't cut it. Especially after the sun goes down and it's freezing cold. I've always thought dressing-gowns were kinda neat. Nobody wears them anymore and they're a handy way to keep warm around the house. Also, I could never find one in *my* size. So I decided to make one myself. They're simple things, really, and I found a photo-tutorial online to give me a hand.

Here's a closeup of the collar:

IMG_1298.jpg


And the trim-fabric:

IMG_1294.jpg


I used that to make the belt, the belt-loops, and a sort of one-inch border around the bottom hem, the front, collar and cuffs. It's mostly for decoration, to hide all the raw edges.

I made it ankle length (it's about 3 inches off the ground at the bottom) because I wanted something that covered me up as much as possible. The front could afford to be maybe a couple of inches bigger, but I'm not dissatisfied with the results. It's comfortable and I can move around in it easily. Put it on, take it off, and most importantly, walk with it without falling on my ass!

If you're wondering how big the finished product is, as a height-reference, I'm 5'6".

From the first measurement and cut, to finally doing the photo, took about three days. Attaching the sleeves to the top were a bit tricky and I uttered words that you'd only hear from a constipated sailor on the toilet, but I got there in the end.

These photos are here because of members who desired me to share the finished product with them. Deacon, and VictorBrunswick.

IMG_1305.jpg
 
Last edited:

Nick D

Call Me a Cab
Messages
2,166
Location
Upper Michigan
I finally finished the blue suit I started three (!) years ago. The trousers and waistcoat I made back then, the jacket was made over the last couple months. I had put the fabric away and just never got back to it. The trousers are the Eva Dress '30s pattern, the waistcoat is a copy from an early '40s suit, and the jacket is from a Weldon's pattern from c. 1950. The jacket is a 'semi-hacking' jacket but I made some alterations to it so it now has a couple hacking features but isn't a hacking jacket. Here's the pattern envelope:

SAM_1849.jpg


I shortened the body and sleeves, omitted the ticket pocket, didn't put vents in the back, put in two interior pockets, and made the back lining a half lining. It's still quite fitted at the waist with slanting side pockets. I think the breast pocket is a bit high. The underarm dart stops well short of the sleeve seam, which gives some ease of movement without back pleats:
SAM_1848.jpg


Interior:
SAM_1845.jpg


Detail of interior pocket and linings:
SAM_1846.jpg


Here's the suit. It's my third mens jacket and I'm moderately pleased with it. I'm not near the level of herringbonekid or Qirrel yet, but I think I'm getting better. I did have trouble with the sleeve ease. Part of that is there's more blend than wool in the fabric and I had a hard time shrinking, and partly my incorrect setting on my part, though the hang is good. There's some fullness in the front above the centre button that needs to be addressed, but I can fix that on this jacket and avoid it on the next. I need to draft a new collar, and either move back the roll line or the neck point to increase the opening slightly, as it is it's a bit too narrow. I think this will work well for a peak lapel alteration, too.

SAM_1830.jpg

SAM_1838.jpg

SAM_1834.jpg


The armholes are really high, about as high as they can be, so between that and the underarm ease there's great freedom of movement.
SAM_1836.jpg


Next suit for me is heavy-weight cream Irish linen, but I've got a few other projects first in the queue.
 

herringbonekid

I'll Lock Up
Messages
6,016
Location
East Sussex, England
looks really well made Nick ! i think the chest pocket height looks fine.
i had the fullness around the top button problem before. drove me mad trying to work out how to get rid of it as i didn't want to take anything off the lapel edge. i basically took the excess out of the darts and front side seams.
the only thing i notice on your jacket is a bit of pinching on the left sleeve (in the last photo) just up from the chest pocket. other than that... great job !
 
Last edited:
Messages
470
Location
North Wales Uk
I finally finished the blue suit I started three (!) years ago. The trousers and waistcoat I made back then, the jacket was made over the last couple months. I had put the fabric away and just never got back to it. The trousers are the Eva Dress '30s pattern, the waistcoat is a copy from an early '40s suit, and the jacket is from a Weldon's pattern from c. 1950. The jacket is a 'semi-hacking' jacket but I made some alterations to it so it now has a couple hacking features but isn't a hacking jacket. Here's the pattern envelope:

SAM_1849.jpg


I shortened the body and sleeves, omitted the ticket pocket, didn't put vents in the back, put in two interior pockets, and made the back lining a half lining. It's still quite fitted at the waist with slanting side pockets. I think the breast pocket is a bit high. The underarm dart stops well short of the sleeve seam, which gives some ease of movement without back pleats:
SAM_1848.jpg


Interior:
SAM_1845.jpg


Detail of interior pocket and linings:
SAM_1846.jpg


Here's the suit. It's my third mens jacket and I'm moderately pleased with it. I'm not near the level of herringbonekid or Qirrel yet, but I think I'm getting better. I did have trouble with the sleeve ease. Part of that is there's more blend than wool in the fabric and I had a hard time shrinking, and partly my incorrect setting on my part, though the hang is good. There's some fullness in the front above the centre button that needs to be addressed, but I can fix that on this jacket and avoid it on the next. I need to draft a new collar, and either move back the roll line or the neck point to increase the opening slightly, as it is it's a bit too narrow. I think this will work well for a peak lapel alteration, too.

SAM_1830.jpg

SAM_1838.jpg

SAM_1834.jpg


The armholes are really high, about as high as they can be, so between that and the underarm ease there's great freedom of movement.
SAM_1836.jpg


Next suit for me is heavy-weight cream Irish linen, but I've got a few other projects first in the queue.
absolutely amazing sir and I have become obsessed with pin collars !!!
VM
 

DeaconKC

One Too Many
Messages
1,706
Location
Heber Springs, AR
Behold my first serious attempt to make for myself, something which I can actually *wear*. This is made out of some fabric which I bought at the local thrift-shop...

IMG_1304.jpg


If you haven't figured out what it is yet, it's supposed to be a dressing-gown. It's winter here in Melbourne, and sometimes, regular PJs just don't cut it. Especially after the sun goes down and it's freezing cold. I've always thought dressing-gowns were kinda neat. Nobody wears them anymore and they're a handy way to keep warm around the house. Also, I could never find one in *my* size. So I decided to make one myself. They're simple things, really, and I found a photo-tutorial online to give me a hand.

Here's a closeup of the collar:

IMG_1298.jpg


And the trim-fabric:

IMG_1294.jpg


I used that to make the belt, the belt-loops, and a sort of one-inch border around the bottom hem, the front, collar and cuffs. It's mostly for decoration, to hide all the raw edges.

I made it ankle length (it's about 3 inches off the ground at the bottom) because I wanted something that covered me up as much as possible. The front could afford to be maybe a couple of inches bigger, but I'm not dissatisfied with the results. It's comfortable and I can move around in it easily. Put it on, take it off, and most importantly, walk with it without falling on my ass!

If you're wondering how big the finished product is, as a height-reference, I'm 5'6".

From the first measurement and cut, to finally doing the photo, took about three days. Attaching the sleeves to the top were a bit tricky and I uttered words that you'd only hear from a constipated sailor on the toilet, but I got there in the end.

These photos are here because of members who desired me to share the finished product with them. Deacon, and VictorBrunswick.

IMG_1305.jpg

Wow! That is fantastic, nice choice on going with the same material for the trim as the collar. It looks great.

Also, Nick the suit is splendid!
 

Shangas

I'll Lock Up
Messages
6,116
Location
Melbourne, Australia
Thanks, Deacon!

You may notice that I swapped the sides around. First photo is right over left, last photo is left over right.

I finally fixed it so that it'll always be right over left. I sewed in a two-piece steel hook-clasp and catch on opposing sides so that the front doesn't flop open accidentally. Here's another photo:

IMG_1307.jpg


Since there's so many wonderful articles of clothing being made here (my gown not being nearly nice enough t be included in this club of bespoke tailoring), I thought it might be interesting to see each others' "tools of the trade", as it were. Here are mine:

IMG_1261.jpg


Buttonholer (red box)
Zigzagger (white box)
Attachments (green box)
Bobbins (16 in total)
Needles (three packets, original Singers)
Motor-grease (full)
Machine-oil can (empty. Actual oil stored elsewhere. Can for display purposes only).
Shears with black, Japanned handles. 8 inches long. Made by Wiss & Sons, Newark, New Jersey.*
'DEAN', English-made measuring-tape. 60 inches.**

IMG_1082.jpg

Singer 99k electric knee-lever sewing-machine from 1950***, restored to running condition by...me.

So, what are the tools that you use to make your creations with?

*,**,***

Shears, measuring-tape and sewing machine were all originally the property of my late grandmother. She was a dressmaker by profession for 30-odd years. She died in November, 2011 at the age of 97. I inherited her tailoring equipment and sewing-machine.
 
Last edited:

Bugsy

One Too Many
Messages
1,126
Location
Sacramento/San Francisco Bay Area
I finally finished the blue suit I started three (!) years ago. The trousers and waistcoat I made back then, the jacket was made over the last couple months. I had put the fabric away and just never got back to it. The trousers are the Eva Dress '30s pattern, the waistcoat is a copy from an early '40s suit, and the jacket is from a Weldon's pattern from c. 1950. The jacket is a 'semi-hacking' jacket but I made some alterations to it so it now has a couple hacking features but isn't a hacking jacket. Here's the pattern envelope:

SAM_1849.jpg


I shortened the body and sleeves, omitted the ticket pocket, didn't put vents in the back, put in two interior pockets, and made the back lining a half lining. It's still quite fitted at the waist with slanting side pockets. I think the breast pocket is a bit high. The underarm dart stops well short of the sleeve seam, which gives some ease of movement without back pleats:
SAM_1848.jpg


Interior:
SAM_1845.jpg


Detail of interior pocket and linings:
SAM_1846.jpg


Here's the suit. It's my third mens jacket and I'm moderately pleased with it. I'm not near the level of herringbonekid or Qirrel yet, but I think I'm getting better. I did have trouble with the sleeve ease. Part of that is there's more blend than wool in the fabric and I had a hard time shrinking, and partly my incorrect setting on my part, though the hang is good. There's some fullness in the front above the centre button that needs to be addressed, but I can fix that on this jacket and avoid it on the next. I need to draft a new collar, and either move back the roll line or the neck point to increase the opening slightly, as it is it's a bit too narrow. I think this will work well for a peak lapel alteration, too.

SAM_1830.jpg

SAM_1838.jpg

SAM_1834.jpg


The armholes are really high, about as high as they can be, so between that and the underarm ease there's great freedom of movement.
SAM_1836.jpg


Next suit for me is heavy-weight cream Irish linen, but I've got a few other projects first in the queue.


Absolutely splendid, Nick!!
 

Nick D

Call Me a Cab
Messages
2,166
Location
Upper Michigan
Many thanks, gents! herringbonekid, I will see if that will work when I fit the next one. It may have been a basting problem here, I'm not sure. It didn't show up until after I made the buttonholes and removed the basting. Sew and learn, the next'll be better.
 

Forum statistics

Threads
107,345
Messages
3,034,640
Members
52,783
Latest member
aronhoustongy
Top