Want to buy or sell something? Check the classifieds
  • The Fedora Lounge is supported in part by commission earning affiliate links sitewide. Please support us by using them. You may learn more here.

Photographing your hat - How to do it well?

Flieger

Practically Family
Messages
570
Location
Umea, Sweden
Reading the backlogs here at FL I often come across comments like:

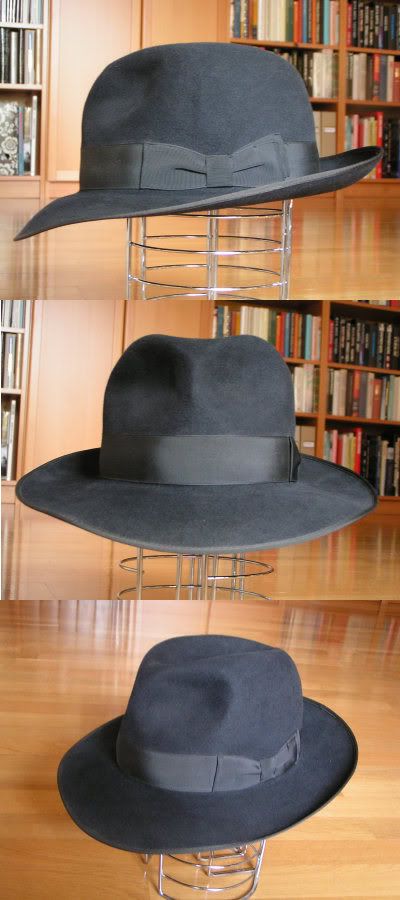
"Sorry for the crappy photo..."
"The color is wrong in this shot..."
"The details are beautiful but unfortunatley they don't show up..."

Etc, etc.

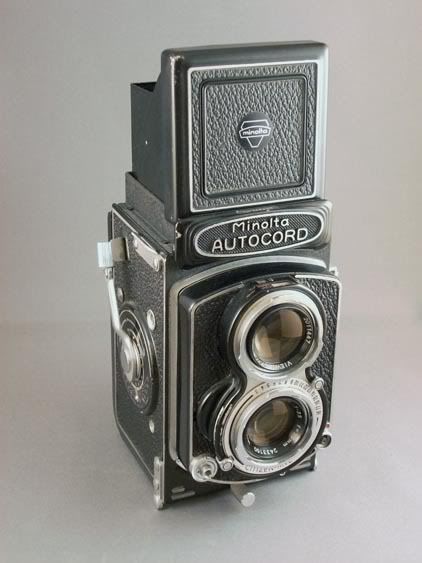
In this day and age of digital cameras one would think that getting a decent shot or two of your hat (or other object) would be an easy task... but I find it's anything but. Ok, some of you out there take brilliant photos but for the rest of us who don't always succeed - How about a photo discussion?

Maybe this topic should be placed somewhere else on the forum but I choose the "Hats" section because.. well, I like hats and I love to learn how to document them properly. :)

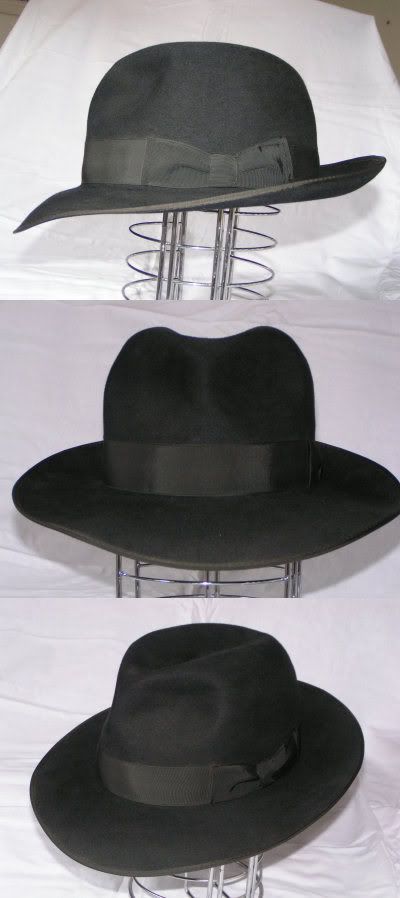
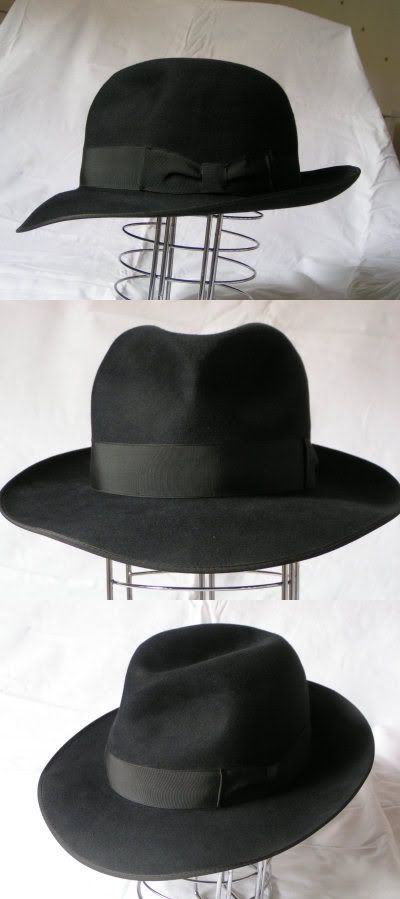
So, how to get good photos of your new darling lid?

- Lighting
- Color
- Angles to choose
- Details to show


Regards
/Flieger
 

MrPumpernickel

One of the Regulars
Messages
111
Location
Sweden
Oh man *cracks knuckles* it all comes down to working with what you got in terms of both camera equipment as well as lighting solutions.

I think I'm safe to assume that most people here have some sort of compact consumer grade digital camera so I'll focus mainly on that. Nothing wrong with such a camera, but there are some pitfalls which one should be aware of if trying to take high quality shots with such a camera, but at the same time it is surprisingly easy to take good shots with just a few things to think about. I'll get back to the pitfalls as they apply to what I'll write below.

The most important thing ought to be lighting, and there are many different schools of lighting, especially when it comes to product lighting which essentially taking a photo of your hat is. You have basically three ways to go by things (or a combination of them). Either you have natural avaliable light, you have artificial light (lightbulbs, flourescant lamps) or you have flashes.

In my mind, natural light (daylight) is the best since it's most often in a color which brings out the correct color of what you're photographing (unless you're shooting at sunrise or sunset obviously). Though anyone with some knowledge of color theory knows that objects appear in different colors and intensities depending on the color of the light they're presented in. Natural light shining in through a window, though not directly on the hat, can also create quite soft shadows which can show the shape of the hat as well as the color and whatnot correctly. Darker and lighter areas on an item shaped both concave and convex like a hat can be is imperative to get a proper feel for the hat. Direct light can cause harsh shadows, which also can work, but may not be the best for product photography such as this.

Lightbulbs and flourescant lamps have another problem, and that's their color. Lightbulbs often tint photographs yellow and flourescant lamps often blue or green and this is where white balance becomes so very important. Most digital cameras today have a setting which allows you to change the white balance for indoors, lightbulbs, flourescant lamps, sunlight, etc. Use it, religiously, it will help your photographs since the camera will compensate for the color of the light (as long as it's set properly).

The same goes for flashes, especially in-camera flashes, and cameras often have a separate white balance setting for the flash. When it comes to lighting solutions the in-camera flash is probably the worst idea, and only a last resort, to use. Since it's a lightsource that's affixed to the camera and very direct it'll blow out any shadows and often ruin any feel the photo would've given of the hat. It'll be harder to get the overall shape across and quite often the color (look at white balance) will be grossly misrepresented. It can also, due to its intensity, create an unwanted sheen on even rather dull materials. This is the greatest pitfall in my mind. There was a post recently with a black or very very dark blue hat that under the influence of a flash looked really intensely blue. In other words looked nothing like the hat did.

The absolute best when it comes to white balance is if your camera has the ability to measure the light temperature and make a temporary white balance profile depending on the lighting right there and then (this is done by measuring against a neutral gray or white surface, often called a gray-card). Not all cameras has this feature, read your manual and learn to love it if you have it.

Another thing to think about is the ISO value, if you have good strong lighting you can dial the ISO value down, the lower ISO the less grain in your photos, the less grain the better for this kind of photography. After all, you want a clear picture of a hat, not a picture of grain with a hat behind it.

Remember though, just because your hat may be tinted strangely after you've photographed it doesn't mean it has to stay that way. You can take it into your favourite graphics editor (Photoshop, Paint Shop Pro, The Gimp to mention a few) and correct the color values there to better represent what it actually looks like.

Aside from lighting it's also a good idea to set up the photo so it focuses on the hat, i.e. eliminate a cluttered background. Using a blank wall as a background or throwing a sheet over a table and photographing the hat against that helps to bring the hat into focus. The less distractions the better really.

That's it for lighting and color, when it comes to angles and details I think it's upto anyone what to choose, but a good front, side and 3/4 view should be a bare minimum I think.

That's it for consumer cameras and amateur photographers. While I'm no expert, and I bet there are others with great ideas here as well, I could go into more detail on how to set up a simple/do it yourself/ghetto three point lighting setup more in detail if people want to.

If I've rambled so that anyone don't understand what I'm on about (which is not unlikely, it's 4:27am over here) by all means ask and I'll do my best to explain.
 
Messages
11,579
Location
Covina, Califonia 91722
FOCUS. Most point and shoot cameras will list the minimum distance that the lens will give you an in focus shot in the handbook. Closer and it is out of focus. If you have a zoom feature this may allow you to fill the frame with the hat and still be in focus.

Busy backgrounds are a drawback too.
 

Russ

One of the Regulars
Messages
209
Location
Tokyo
Use a tripod!

If you don't have a tripod, buy yourself a cheap one and use the timer on your camera. Then set the camera as far away from you as possible.

Self photos taken with the camera held at arm's length make the hat look terribly tapered, and defeats the purpose of spending extra money and effort on finding that non-tapered hat. It's the same principle that makes your ears disappear if you stand too close to a mirror (let's see how many can figure that one out).

They also tend to make the hat wearer look like a nerd who has no friends who can snap a picture. At least a guy can fool others into thinking he has friends by using a tripod. :)

Getting outside into the sunlight (and away from the computer) also helps to dispel the nerd image, and as mentioned above will give great light. Since hats are normally worn outside, this is the hat's natural environment anyway.

BTW my son snapped the photo in my avatar and he has two legs, making him a biped and not a tripod. :)
 

Flieger

Practically Family
Messages
570
Location
Umea, Sweden
Oooh... This is good stuff! :eusa_clap Keep it coming!

I was hoping to have my new EICHAP black fedora today to experiment on, but the mailbox was empty. Maybe tomorrow.

Cheers

/F

EDIT: The EICHAP did arrive today. The postman was just later then ususal. :)
 

Flieger

Practically Family
Messages
570
Location
Umea, Sweden
Experimentation

My Eichap black fedora came today after all, after a quick cleanup and bash I decided to experiment with a couple of photos.

First set - Camera set to full auto. Natural light from window. Cloudy day outside. Hat placed on wood floor. Buzy background.
Eichap_Auto_nat_light.jpg


Second set: Neutral background. Nat. light from window (cloudy day) + Flash. White balance on Auto.
Eichap_Flashnat_light.jpg


Third set: Neutral background. Natural light from window (still cloudy). White balance calibrated on white card.
Eichap_WBnat_light.jpg


It's a bit of a difference in color between the photos but not as much as I had expected. The hat looks black or at least dark gray. :)

/Flieger
 

Dav3

New in Town
Messages
46
Location
Alberta, Canada
Yeah, a flash never really seems to do a hat any good.


Another thing that's good for photographing hats. If at all possible- get a picture of the hat on your head. You can Take pictures of it all day from every angle, but it'll never look as good as it does when it's being worn.
 

Twitch

My Mail is Forwarded Here
Messages
3,133
Location
City of the Angels
Yep it seems all the pics I've seen of appearance vs. stated color have been done in by the flash. I'd agree that the flash is the main cause of color changes.

The illustrations of the variance of a black hat still make it look black in any format. I mean I'd say it was black in any picture since there are no super-dark, dark gray hats. I find the greys that turn blue and vice versa plus the tans, browns olives that morph into other shades more problematic:eek:
 

MrPumpernickel

One of the Regulars
Messages
111
Location
Sweden
No problem bolthead, glad to be of help.

John, indeed, that's an important thing I forgot about. Focus is pretty imperative.

Flieger, I think definitely what would've come out best would be the first with the uncluttered background, or the second without the flash. Which indeed the third set of images are (heh, missed that set before writing the first part of this comment). The main problem with the second set of images is without a doubt the blown out shadows, any feel of the shape of the hat is lost. In contrast it's marvellously shown in the first set of images, but the background distracts.

Nice looking hat by the way :)

Dav3 said:
Yeah, a flash never really seems to do a hat any good.
That's a bit too strong of a generalization though. An in-camera flash seldomly does a hat any good. Though, if you have a proper off camera flash (either attached to the camera hotshoe or fired remotely at another angle) together with a diffuser to make the flash light less harsh you can take absolutely awesome pictures with a flash, both of hats and other things.

Twitch said:
Yep it seems all the pics I've seen of appearance vs. stated color have been done in by the flash. I'd agree that the flash is the main cause of color changes.
Flashes, lightbulbs as well as badly set up white balance settings are without a doubt the reason for the majority of color errors, especially at indoor photography.
 

Mike in Seattle

My Mail is Forwarded Here
Messages
3,027
Location
Renton (Seattle), WA
It also depends on how your monitor is calibrated, and how much tweaking you do to colors & contrast. I had a cousin email photos that looked just bizarre, until a week later when her monitor died and she sent new copies after "un-fixing" the first batch.
 

Dinerman

Super Moderator
Bartender
Messages
10,562
Location
Bozeman, MT
When I take good pics of mine, I set them up on a white background, up on a hat stand, with the brim down. Since my dad is a professional photographer, we have all the big lights, and sync them to the camera.
Get good 3/4 views, and make sure everything's in focus.
 

MrNewportCustom

Call Me a Cab
Messages
2,265
Location
Outer Los Angeles
Reflectors . . .

Fliegler, a reflector would have really brought out the details on the dark side of your hat - the side away from the light source. You have some options, depending on how much you want to spend, for some spectacular results.

If you have roommates or a wife and/or kids, you can go super cheap and use a bedsheet. Place the hat on the sheet, and have the tykes hold it up behind and to the dark side of the hat. You've now built the world's cheapest cyclorama/reflector combo - depending on the quality of the sheets, of course. All it'll cost you is a couple popsicles for the kids . . . afterward! You don't want them dripping anything on your hat. :D

You can make your own reflectors with mat board and foil. Scrumble up the foil a bit and spread it out again. Do this several times until you have a bunch of tiny "mirrors", being careful not to tear it. (If you do tear it, you can tape it back up. It won't affect the reflectiveness.) Fold the edges around to the back and tape it to the mat board. I made one that's two feet by three feet by taping two pieces of foil together.

For softer lighting, you can use plain white mat board. If you get mat board with a different color on the back - black, tan, etc. - you can experiment with effect. Black subtracts light, gold warms the light, etc. But stick with neutrals - black, white, gray and silver - for showing true color. (Since hats generally don't reflect much light themselves, avoid using the black side.)

Or you can buy reflectors like these http://www.ilfordphoto.com/applications/page.asp?n=54 at your local camera shop. Prices are commensurate with size, and they fold up for easy storage and transportation.

Whichever route you take, using reflectors is easy. Place one near the dark side of the hat and slowly swing it side to side and up and down while watching how the light falls on the subject. If you don't want to crop the picture later, look through the camera to make sure it isn't visible. If you can see any part of the reflector behind the hat, move it more to the side. Take a shot and, if you're using a digital that has zoom feature for pictures you've already taken, check the detail on the dark side of the hat. If there's not enough for your liking, move the reflector closer and shoot another.

Your best arangement will be as such: Imagine a clock with your hat as the center of the dial. Your camera will be at six o'clock. The main light (window, flash, etc.) somewhere between three and five o'clock, and the reflector between seven and ten o'clock. For better detail on the top of the brim, have someone hold the reflector slightly higher than the hat and aiming the reflected light at the brim.

If you don't have a cable release or a remote, use a tripod and the self-timer to avoid camera shake.

. . . And etcetera . . .

I use a "Studio in a Box" that cost about $100.00 for shooting small items. It comes with two tungston lights (I color balance the pictures using, of all things, Kodak Easyshare, and adjust the size and make other changes with PhotoShop.) A small studio gives you complete control of the light, direction, intensity, balance, etc., if that's what you want.
You've probably seen a couple pictures I've taken with it in other threads.
dscn0686.jpg

I took this with my point and shoot digital. No flash. (Sorry it's not of a hat.)

The "Studio in a Box" is too small for shooting hats, but you can make a larger one with some difuser cloth and a little imagination.

My dream is to someday have a Norman studio lighting system, complete with difusers, shades, power pack, backdrops, at least four lights . . . just like I used while shooting amatuer models in college.


Lee
______________________________

I hope this helps.
 

Dinerman

Super Moderator
Bartender
Messages
10,562
Location
Bozeman, MT
It's on a wonderful hat stand I found at my local westernwear store. (see below) The hat sits up on it, so you can snap the brim down, but because the thing sits up on feet, it's invisible in photos.
Lit with 2 white lightning 1600 photo lights with softboxes.
IMG_3555.jpg
 

Flieger

Practically Family
Messages
570
Location
Umea, Sweden
MrNewportCustom said:
Fliegler,...
...I hope this helps.

Lee: That helps a lot! Getting tips on how to make your own "home studio on the cheep" is exactly what I was after. I'm sure there are more then me that feels that way. Taking decent photographs can make it much easier to get a good price when you sell something on eBay, for instance.

Dinerman: Beautiful shot! Exactly what I'm aiming for.

Cheers
/Flieger
 

MrNewportCustom

Call Me a Cab
Messages
2,265
Location
Outer Los Angeles
Flieger said:
Lee: That helps a lot! Getting tips on how to make your own "home studio on the cheep" is exactly what I was after. I'm sure there are more then me that feels that way. Taking decent photographs can make it much easier to get a good price when you sell something on eBay, for instance.

Dinerman: Beautiful shot! Exactly what I'm aiming for.

Cheers
/Flieger

Happy to help, Flieger. :)

One thing I've noticed about posting pictures on the web: Much like actual prints, they "darken down." When you adjust your picture for posting, make it ever-so-slightly lighter than you like. I've reposted a couple shots that looked perfect in Photoshop, but lost shadow detail online.

Dinerman: That hat stand certainly does disappear. Thank you.

:eek:fftopic:

Your shot reminds me of a small product shot I did back in college. The instructor was one of those where you either did exactly as he'd instructed, or something so spectacular that he didn't dare give you anything less than an "A".

His one rule for this assignment was; You can use only the softbox to light your product. Since I was shooting a transparent product (a bottle of colonge) I needed to light it from behind. So, instead of lighting it from the front and putting velum paper on the back - as he did while demonstrating with the bottle I brought - on a dark background, I swung the softbox beneath an opaque light table and placed a relfector over it. When I explained the rule and my set-up to the studio manager, his reply was, "That's one way to do it."

I was the only one who didn't do as instructed.


Lee
_______________________

I got an "A."
 

Forum statistics

Threads
107,328
Messages
3,034,194
Members
52,776
Latest member
HughGDePoo
Top