Want to buy or sell something? Check the classifieds
  • The Fedora Lounge is supported in part by commission earning affiliate links sitewide. Please support us by using them. You may learn more here.

Sewing Lessons & FAQ

SayCici

Practically Family
Messages
813
Location
Virginia
kamikat said:
Have you made the skirt? How is it? I have this but haven't made it.
The best way to do this is sew the two long seams and turn right side out, then tuck your short ends inside and topstitch. Have you cut them already? If not, add 1in to the width to account for seam allowance. If they are already cut, use 1/4in seam allowance, or smaller if you feel comfortable with smaller.
Thank you! I'm all finished except for the hem. :)

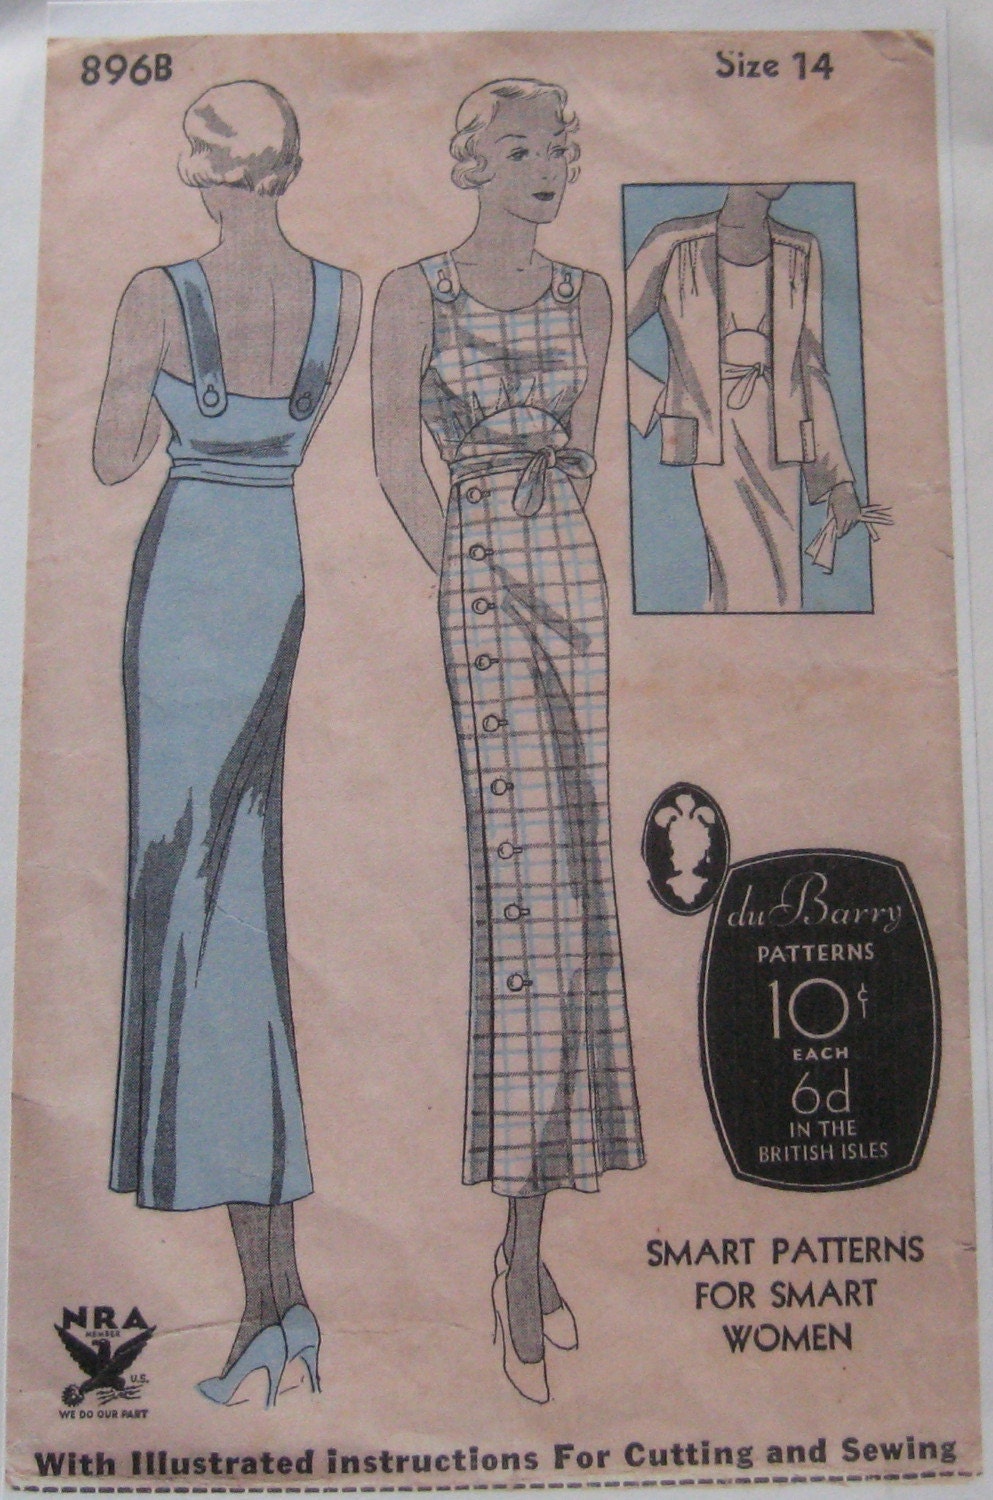
The skirt is really easy and sews up quick. My fabric is a 100% cotton corduroy and it gives me a lot of volume without a crinoline.
 

SayCici

Practically Family
Messages
813
Location
Virginia
il_430xN.69588010.jpg


I am currently working on this pattern, a reproduction by VFL, and I cannot discern this paragraph at all:

"Turn in 1/4" and stitch front edges of D and Right Front Skirt E (dia.2). Fold D and E toward outside along lines of small o. Stitch upper ends. Turn hem facings to inside along lines of small o. Baste to position."

This pattern has all of 3 diagrams showing the construction of this thing, and I just can't wrap my head around this part, which is sewing together the two front parts of the skirt (side with buttons, side with buttonholes) that you can see on the pattern envelope. I feel like if there were a picture for each step I could get it, but the diagram shows me 19 steps at once.
 

Lady Day

I'll Lock Up
Bartender
Messages
9,087
Location
Crummy town, USA
SayCici said:
"Turn in 1/4" and stitch front edges of D and Right Front Skirt E (dia.2). Fold D and E toward outside along lines of small o. Stitch upper ends. Turn hem facings to inside along lines of small o. Baste to position."

It seems its talking about the edge treatment of the neckline, 'folding under' and magically it becomes facing? The reference to the dots could mean the button holes...

LD
 

Miss 1929

My Mail is Forwarded Here
Messages
3,397
Location
Oakland, California
SayCici said:
il_430xN.69588010.jpg


I am currently working on this pattern, a reproduction by VFL, and I cannot discern this paragraph at all:

"Turn in 1/4" and stitch front edges of D and Right Front Skirt E (dia.2). Fold D and E toward outside along lines of small o. Stitch upper ends. Turn hem facings to inside along lines of small o. Baste to position."

This pattern has all of 3 diagrams showing the construction of this thing, and I just can't wrap my head around this part, which is sewing together the two front parts of the skirt (side with buttons, side with buttonholes) that you can see on the pattern envelope. I feel like if there were a picture for each step I could get it, but the diagram shows me 19 steps at once.
Can you post a scan of the diagram?
 

SayCici

Practically Family
Messages
813
Location
Virginia
Lady Day said:
It seems its talking about the edge treatment of the neckline, 'folding under' and magically it becomes facing? The reference to the dots could mean the button holes...

LD
Hmm, well I've already faced the neckline and done all of the buttonholes. Here's a picture of the back of the envelope:
il_430xN.69588099.jpg
 

Lady Day

I'll Lock Up
Bartender
Messages
9,087
Location
Crummy town, USA
Well a diagram certainly helps :)

it appears to be telling you to turn the fabric under and that becomes the facing (doubled fabric) for the button holes. the 1/4" is the allowance for the slight turn under seen on part D. There seem to be pairs of holes on the picture D on the pattern back diagram, but there are also two different sets of holes on either side of the button holes markings (spaced wider, going down the skirt. Those seem to be the marking places that paragraph is referencing.

LD
 

Lauren

Distinguished Service Award
Messages
5,060
Location
Sunny California
I think it just wants you to turn in 1/4" on the edge then the additional amount from the o's to make the underlap. May be wrong, but that's what it sounds like to me after seeing the pictures :)

*edit*HA. I just read what LD said and I just said the same thing. Note to self- look before posting.
 

SayCici

Practically Family
Messages
813
Location
Virginia
Lady Day said:
it appears to be telling you to turn the fabric under and that becomes the facing (doubled fabric) for the button holes. the 1/4" is the allowance for the slight turn under seen on part D. There seem to be pairs of holes on the picture D on the pattern back diagram, but there are also two different sets of holes on either side of the button holes markings (spaced wider, going down the skirt. Those seem to be the marking places that paragraph is referencing.

LD
:) Thanks! Something just clicked and I think I understand why I was confused with the instructions (instead of reading 'sew front edges of D and E' for facings, I was thinking "stitch front edge of D to front edge of E" which wouldn't make sense).

Rest of the directions:
"Turn hem facings to inside along lines of small o. Bate to position. Cut hem facing under buttonholes and finish."

Does it say I am securing these together? I'm embarrassed this is giving me so much trouble. :eek:

Miss 1929, thank you! As you can see, I jumped straight to my fabric, haha.
 

Lauren

Distinguished Service Award
Messages
5,060
Location
Sunny California
I think you leave it like a shirt dress- so they aren't attached. The buttonholes just get cut so the buttons can go through. Sometimes they did this on sports dresses so you could unbutton a few buttons at the bottom to move easier- like if you were playing tennis or something.
 

Lady Jessica

One of the Regulars
Messages
243
Location
Southern California
I have a question, and I figured this was the right place to ask.

I recently acquired a sewing machine from my grandma, and she told me it was broken. I took it apart, messed with it for a few hours, and got it to work. Sort of. The problem is, the thread under the machine won't come up and stitch through. Is there a part to replace, if any of you know? Is there a way to fix this, or am I going to have to go buy a new machine?

I'm not sure what any of the actual parts are called. I believe it's called a "bobbin" the part that won't come through, but I'm at a loss. I'm really new at this.
 

SayCici

Practically Family
Messages
813
Location
Virginia
Lady Jessica said:
I have a question, and I figured this was the right place to ask.

I recently acquired a sewing machine from my grandma, and she told me it was broken. I took it apart, messed with it for a few hours, and got it to work. Sort of. The problem is, the thread under the machine won't come up and stitch through. Is there a part to replace, if any of you know? Is there a way to fix this, or am I going to have to go buy a new machine?

I'm not sure what any of the actual parts are called. I believe it's called a "bobbin" the part that won't come through, but I'm at a loss. I'm really new at this.
Jessica, are you raising the bobbin thread before you try to sew?
 

Joie DeVive

One Too Many
Messages
1,308
Location
Colorado
Lady Jessica said:
I pull it up from the bottom by manually making the needle go down and 'catch' the bobbin thread, and then I pull it out.

That sounds correct.
I'm afraid I'm left scratching my head as to what exactly is going wrong....
But as to old machine versus replacement, I think most ladies here would encourage you to look into repairing your old machine rather than buying new, even if it costs more. For durability and reliability, I don't think you can beat one of the old all manual (non-computerized) machines, but that's me.
 

sixsexsix

Practically Family
Messages
870
Location
toronto
SweetieStarr said:
I looked at the pattern co's and Etsy. Didn't see any I liked that were my size. I try to stay away from eBay, but just found one on there that could be possible. I sent the seller a question about the yardage.

This is a great bolero pattern . It's OOP but fairly easy to find for cheap.
6280_104301977764_509252764_2299283_6000834_n.jpg
 

Lady Jessica

One of the Regulars
Messages
243
Location
Southern California
Joie DeVive said:
That sounds correct.
I'm afraid I'm left scratching my head as to what exactly is going wrong....
But as to old machine versus replacement, I think most ladies here would encourage you to look into repairing your old machine rather than buying new, even if it costs more. For durability and reliability, I don't think you can beat one of the old all manual (non-computerized) machines, but that's me.

It looks like a seventies model, and I'm pretty sure it was stored the way I got it. If that's the case, it's definitely durable! :) I guess I'll go down to Jo-Ann's and ask a million questions. Thanks for the help anyways, ladies!
 

ShoreRoadLady

Practically Family
Lady Jessica said:
It looks like a seventies model, and I'm pretty sure it was stored the way I got it. If that's the case, it's definitely durable! :) I guess I'll go down to Jo-Ann's and ask a million questions. Thanks for the help anyways, ladies!

I'd second the suggestion to take it into a sewing machine repair shop. Older machines tend to be very durable, and will last for years if properly cared for. At the least, the technicians should be able to take a look and see if it's something that can be repaired inexpensively.

I hate to knock JoAnn's, but in my experience, their employees don't tend to be very knowledgeable, and their priority is selling new merchandise.
 

SweetieStarr

A-List Customer
Messages
314
Location
CA
sixsexsix said:
This is a great bolero pattern . It's OOP but fairly easy to find for cheap.
6280_104301977764_509252764_2299283_6000834_n.jpg

Thanks everyone for your suggestions. I actually got a pattern on ebay and am waiting for it to arrive. I don't have a pic right now, but it's from the 1950s and really cute!
 

Forum statistics

Threads
107,294
Messages
3,033,206
Members
52,748
Latest member
R_P_Meldner
Top