The Block Guy
New in Town
- Messages
- 17
- Location
- Ohio
Brad Bowers said:Good to know you'll have a 3D duplicator. That may be the only way I can get a set of proper Derby blocks. I've only found one on ebay, but it can work as a pattern.
Then, if I can just find a front and rear tolliker, I can make proper Derbies. Nobody makes those particular tollikers anymore, and I have yet to see one come up for auction on ebay.
Brad
The Block Guy said:...
Good old wood blocks are the best if you are going to hit the hat with a lot of steam and hot irons.
...
The Block Guy
The Block Guy said:...
We have a lot of cool stuff in the works....redesigning and bringing back a lot of these things that are hard to come by.
The Block Guy
 John Lofgren Monkey Boots Shinki Horsebuttt - $1,136 The classic monkey boot silhouette in an incredibly rich Shinki russet horse leather.
  Grant Stone Diesel Boot Dark Olive Chromexcel - $395 Goodyear welted, Horween Chromexcel, classic good looks.
  Schott 568 Vandals Jacket - $1,250 The classic Perfecto motorcycle jacket, in a very special limited-edition Schott double rider style.
 tonyb said:Glad to hear it. Does this operation of y'all's have an online presence yet? Or would that be putting the cart before the horse?
Are you still in the prototype phase? I see that rounding jack in your avatar photo. Knocked out many of those yet?
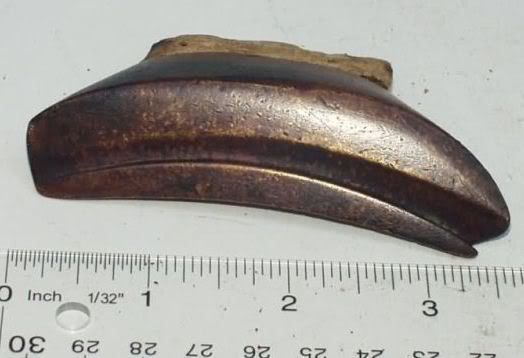
Brad Bowers said:TBG, here's a photo of the business end of one:
The front and rear tolliker is used to make the very short, tight curl on the front and rear of Derbies. A separate curling shackle is used for the sides.
I have no idea how hard it would be to make something like this.
Brad
Are there lathes that will do the right shape? All the oval lathes I've heard of only do two-way symmetrical ones.
I made my block and flanges with a band saw for the coarse shape. A jigsaw would do, too; you'd just have to cut more individual pieces before laminating them. The 'fine' shaping I did with a belt sander. Not professional grade, I'm sure, but adequate for me.
I've just been making some, and laminated my wood into big blocks first. There's a relatively new tool out there ---- basically it's a small chainsaw, running the chain on a 4" disc instead of a 16", 18", 20", etc. bar. Chuck it to a 4" or 4 1/2" angle grinder, and you can rough your block in pretty fast. I used spray adhesive to put my pattern on one end. After roughing it, I clamped each block to the corner of a work bench with two bar clamps, rotating them as needed, then got a close shape with a belt sander resting on my hip. A random orbital finished them up.
")
My first blocks are copies of the 0052. If you are asking about the oval at the flange, basically three ways. When I replaced the reeded sweat in my Stetson I also added one to a wool woman's hat for my wife. It was from 9 West, so is a bit better than the run of the mill cheap Chinese wool felts that most women seem to wear now days. It looked like a Billy Jack hat with two shallow dents, but in a nice peanut butter color.You’re replying to a post that is over 9 years old...don’t expect a reply.
How did you set the oval? I can see how the circumference wouldn’t be that difficult, but the shape/oval sounds tougher to get right. I’ve seen lathes with duplicator capabilities for making furniture legs etc. CNC machines would be the way to go, but a huge investment that isn’t practical if you’re only making blocks for yourself.
If you’re looking at using your blocks to make hats that others will buy, most customers will want to know the profile of the block. The #52 block is a perennial favorite, but others are needed if you’re going for a different look. I think you might end up money ahead if you bought the commercially made blocks of the profile you’re after (or keep watching the used/vintage market).
You might also see if there is a hatter who will let you do some sort of abbreviated apprenticeship?
Sent from my iPhone using Tapatalk Pro