- Messages
- 10,603
- Location
- My mother's basement
There must be about as many variations on brim-binding technique as there are people binding brims. Art Fawcett was good enough to offer a detailed explanation of his method here several months ago. (It’s worth looking into, should you ever want to try it yourself.) Marc Kitter did the same, and there’s a sticky showing enough of how it’s done at J.W. Hats in Utah that a careful observer gets the gist of it.
I’ve now bound a few brim edges – the first one by hand, following Kittter’s method. (I’ve since removed that binding and redone it, by machine.) I figured I’d return the favor(s) done me by passing along a bit of what I’ve learned.
What you’ll need …
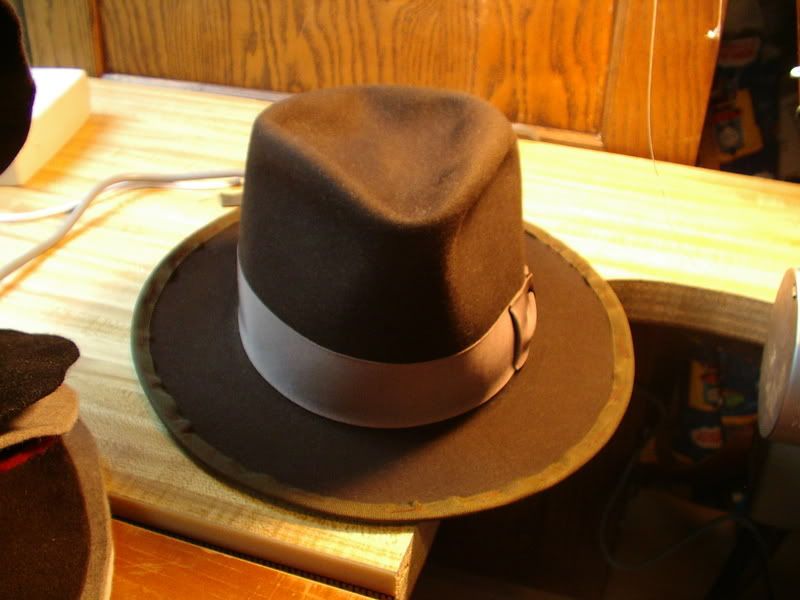
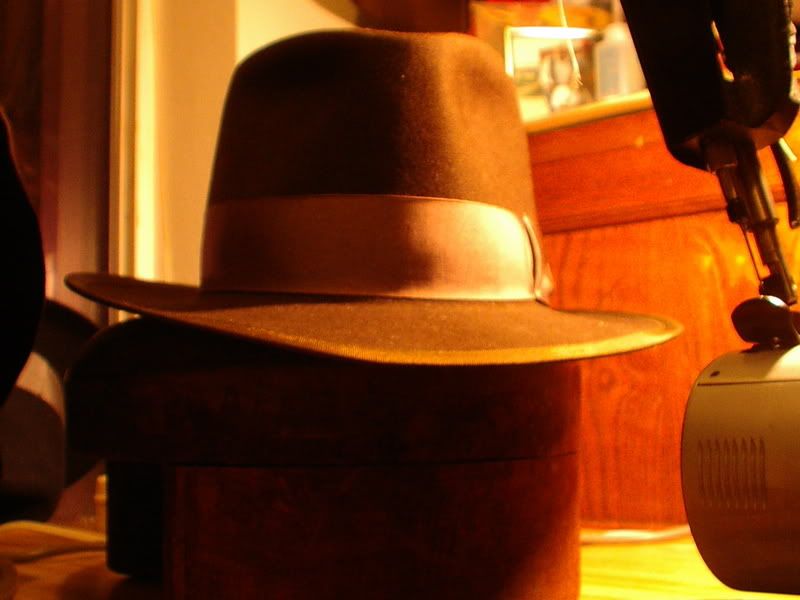
-- A hat in need of a bound edge. (In this case, it’s the raw-edged hat in my current avatar, a hat I made for my own use some time back.)
-- Grosgrain ribbon, in a cotton and rayon blend, in an appropriate color and width (there can be considerable variation in both regards, depending on your wishes, but those options are limited by what both you and the material are capable of doing).
-- A decent iron and ironing surface.
-- A pressing cloth.
-- A spray bottle filled with water.
-- Thread, in a color close to that of the ribbon, and another in a distinctly different hue.
-- A thin hand-sewing needle.
-- A ruler (not absolutely necessary, but it might come in handy).
-- A sewing machine (pretty much any old regular sewing machine will do).
-- A pair of scissors.
Start by cutting a length of ribbon three or four inches longer than the circumference of the brim edge. Fold the ribbon in half lengthwise and carefully iron it so that the fold will keep, being careful not to set the iron’s temperature so high that the ribbon is scorched or made shiny. (No pictures of this part because, well, I didn’t take any, and because I suspect most people can figure this out without visual aids.)
Thread that needle with the contrasting color thread.
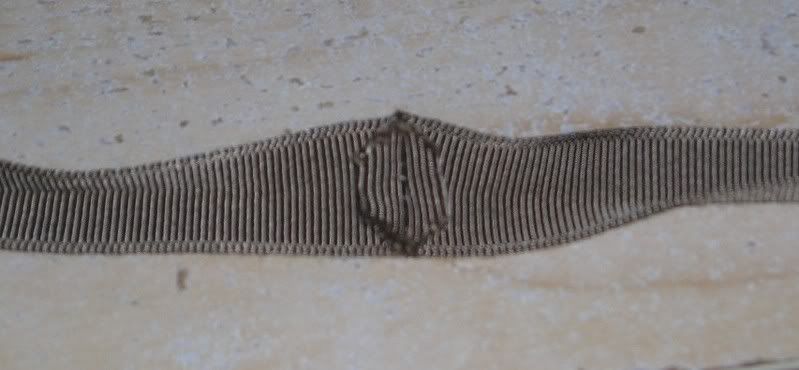
Locate the rear center of the brim edge. Facing the rear of the hat, and moving left to right (you could do it in the opposite direction, I suppose), position the left end of the ribbon just a bit left of center and secure it to the brim by running the needle through the ribbon and felt a couple of times and knotting it. (This should keep it from moving.) Make those initial stitches just to the right of where your rear seam will be, leaving a little bit of it loose on the left so that it can later be folded under. Then, with your right hand, pull the ribbon to the right and hold it to the brim while you make your first basting stitch. Continue along in this fashion, making a basting stitch every inch and a half or so, pulling the ribbon fairly tightly as you go.
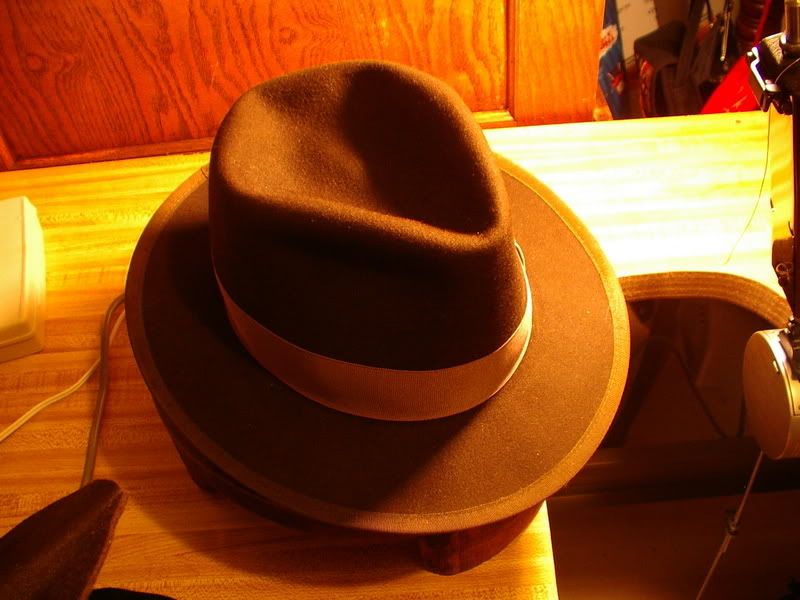
At this point, it will probably look something like this …
Yikes! But don’t despair. This pucker problem is easy enough to fix, provided you use ribbon with significant cotton content, and not that polyester stuff available at your local fabric store.
Once you’ve progressed with the basting back to the rear of the hat, (or almost that far, as you will be leaving the right side of the ribbon loose and overlong for now) thread that needle with the ribbon-colored thread and fold under that loose ribbon you left when you started. It may help to carefully cut it into a shallow V (thanks, Art), with the point of the V being the long end, so that when you fold it under it will be less likely to bunch or pucker. Hand stitch the folded-under end to the body.
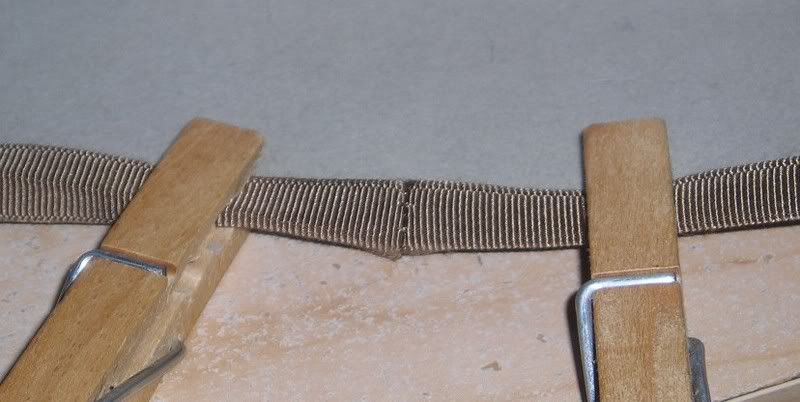
Now press out as much of that pucker in the ribbon as you can, using the iron and the pressing cloth. Do this top and bottom, using care to flatten the ribbon, and not to iron any creases into it. This alone may be enough to flatten out the ribbon, but it probably won’t be, especially if you are attempting a fairly wide binding, as is the case with this hat. So it may be necessary to spray the ribbon with water, top and bottom (it might be best to do this over the sink, or outdoors) and then press it again. See to it that your ribbon is equally distributed on the top and bottom of the brim (this is where the ruler comes in). If it isn’t, you can still manipulate it a bit.
Now it oughta look something like this …
Set the hat aside to dry. Then finish the loose end of ribbon (what had been the right side of it, but is now the left as you face it, sorta like west becomes east if you go far enough) much as you did the other end. Trim it to length (careful, careful), fold it under and make it abut the finished end. Stitch it down with ribbon-colored thread, and make a few stitches securing the ends to each other.
The following assumes you know the basics of operating a regular old sewing machine. If you don’t, well, get someone who does to do it for you, or at least show you what you need to know (which isn’t all that much, truth be told).
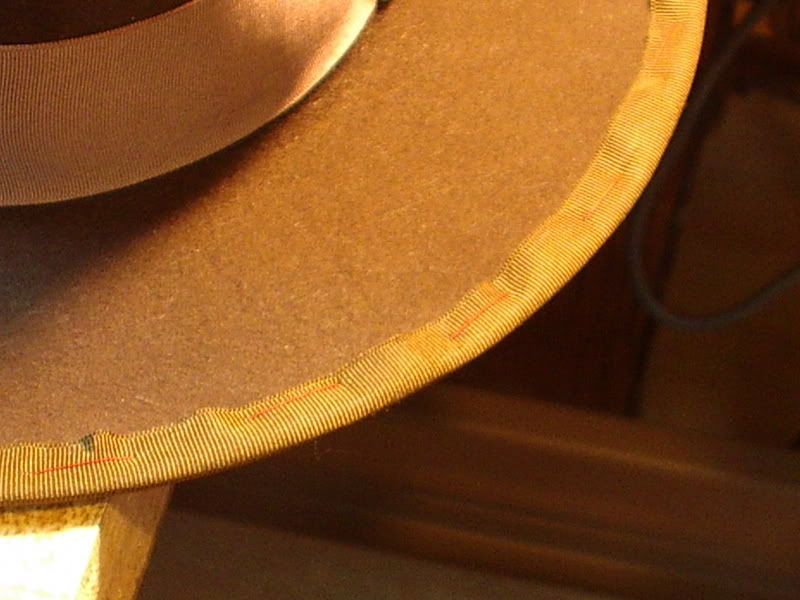
With the machine threaded with the ribbon-colored thread and set for a straight, fairly wide stitch, start at the rear binding seam and S-L-O-W-L-Y work your way around the hat (you may wish to crank the machine by hand, just to be on the safe side), seeing to it that the needle penetrates the ribbon near its edge, but not too near it. Finish up by reversing the machine for a few stitches.
Trim off the excess thread ends and then remove the basting stitches.
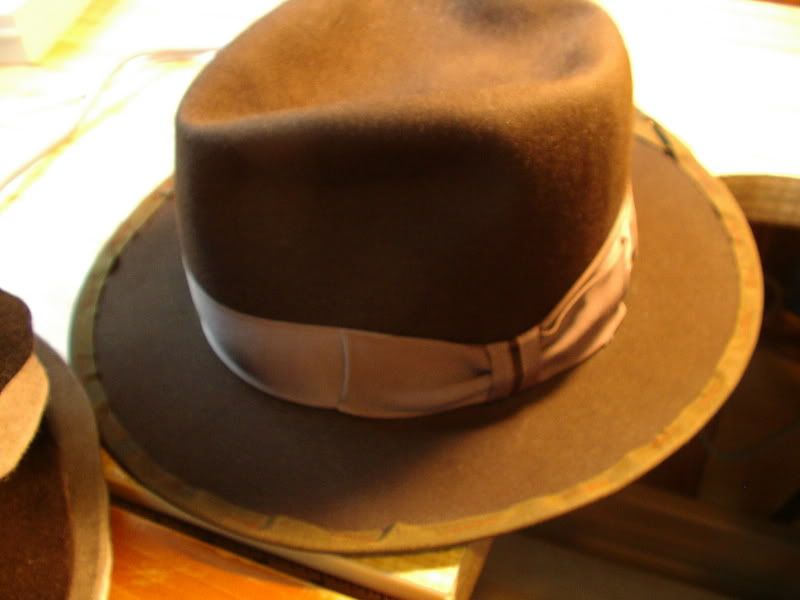
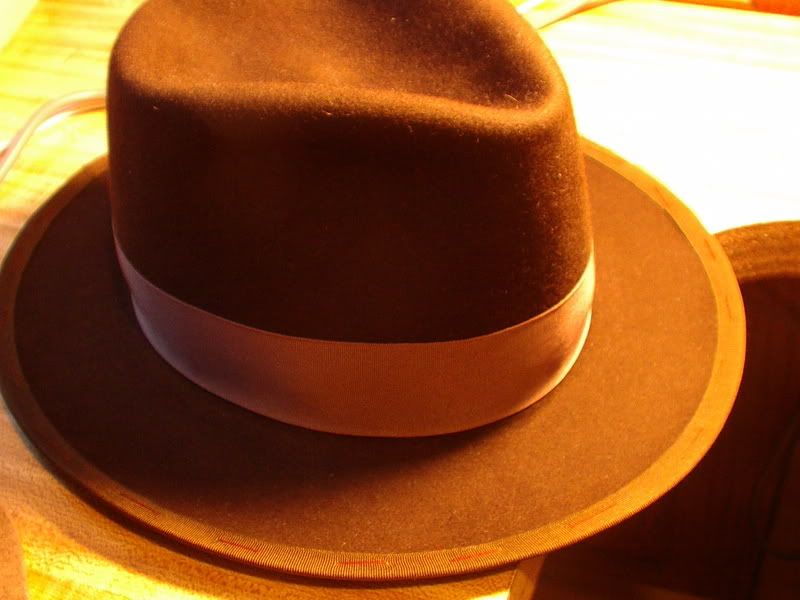
You should end up with something akin to this …
There are undoubtedly better ways to do this, but this method works pretty well. I’ll refine this as I go along, but I feel sufficiently adept that I’ll now bind edges on hats other than the ones I expect to wear myself.
I’ve now bound a few brim edges – the first one by hand, following Kittter’s method. (I’ve since removed that binding and redone it, by machine.) I figured I’d return the favor(s) done me by passing along a bit of what I’ve learned.
What you’ll need …
-- A hat in need of a bound edge. (In this case, it’s the raw-edged hat in my current avatar, a hat I made for my own use some time back.)
-- Grosgrain ribbon, in a cotton and rayon blend, in an appropriate color and width (there can be considerable variation in both regards, depending on your wishes, but those options are limited by what both you and the material are capable of doing).
-- A decent iron and ironing surface.
-- A pressing cloth.
-- A spray bottle filled with water.
-- Thread, in a color close to that of the ribbon, and another in a distinctly different hue.
-- A thin hand-sewing needle.
-- A ruler (not absolutely necessary, but it might come in handy).
-- A sewing machine (pretty much any old regular sewing machine will do).
-- A pair of scissors.
Start by cutting a length of ribbon three or four inches longer than the circumference of the brim edge. Fold the ribbon in half lengthwise and carefully iron it so that the fold will keep, being careful not to set the iron’s temperature so high that the ribbon is scorched or made shiny. (No pictures of this part because, well, I didn’t take any, and because I suspect most people can figure this out without visual aids.)
Thread that needle with the contrasting color thread.
Locate the rear center of the brim edge. Facing the rear of the hat, and moving left to right (you could do it in the opposite direction, I suppose), position the left end of the ribbon just a bit left of center and secure it to the brim by running the needle through the ribbon and felt a couple of times and knotting it. (This should keep it from moving.) Make those initial stitches just to the right of where your rear seam will be, leaving a little bit of it loose on the left so that it can later be folded under. Then, with your right hand, pull the ribbon to the right and hold it to the brim while you make your first basting stitch. Continue along in this fashion, making a basting stitch every inch and a half or so, pulling the ribbon fairly tightly as you go.
At this point, it will probably look something like this …
Yikes! But don’t despair. This pucker problem is easy enough to fix, provided you use ribbon with significant cotton content, and not that polyester stuff available at your local fabric store.
Once you’ve progressed with the basting back to the rear of the hat, (or almost that far, as you will be leaving the right side of the ribbon loose and overlong for now) thread that needle with the ribbon-colored thread and fold under that loose ribbon you left when you started. It may help to carefully cut it into a shallow V (thanks, Art), with the point of the V being the long end, so that when you fold it under it will be less likely to bunch or pucker. Hand stitch the folded-under end to the body.
Now press out as much of that pucker in the ribbon as you can, using the iron and the pressing cloth. Do this top and bottom, using care to flatten the ribbon, and not to iron any creases into it. This alone may be enough to flatten out the ribbon, but it probably won’t be, especially if you are attempting a fairly wide binding, as is the case with this hat. So it may be necessary to spray the ribbon with water, top and bottom (it might be best to do this over the sink, or outdoors) and then press it again. See to it that your ribbon is equally distributed on the top and bottom of the brim (this is where the ruler comes in). If it isn’t, you can still manipulate it a bit.
Now it oughta look something like this …
Set the hat aside to dry. Then finish the loose end of ribbon (what had been the right side of it, but is now the left as you face it, sorta like west becomes east if you go far enough) much as you did the other end. Trim it to length (careful, careful), fold it under and make it abut the finished end. Stitch it down with ribbon-colored thread, and make a few stitches securing the ends to each other.
The following assumes you know the basics of operating a regular old sewing machine. If you don’t, well, get someone who does to do it for you, or at least show you what you need to know (which isn’t all that much, truth be told).
With the machine threaded with the ribbon-colored thread and set for a straight, fairly wide stitch, start at the rear binding seam and S-L-O-W-L-Y work your way around the hat (you may wish to crank the machine by hand, just to be on the safe side), seeing to it that the needle penetrates the ribbon near its edge, but not too near it. Finish up by reversing the machine for a few stitches.
Trim off the excess thread ends and then remove the basting stitches.
You should end up with something akin to this …
There are undoubtedly better ways to do this, but this method works pretty well. I’ll refine this as I go along, but I feel sufficiently adept that I’ll now bind edges on hats other than the ones I expect to wear myself.
")